This is the multi-page printable view of this section. Click here to print.
Documentation
- 1: Overview
- 2: Getting Started
- 3: Deployment docs
- 4: Tutorials
- 4.1: Create clusters
- 4.2: Cluster hosting
- 4.3: Cluster management
- 4.4: Node management
- 4.5: Access control
- 5: FAQ
- 6: Contribution Guidelines
1 - Overview
What is KubeClipper?
KubeClipper is a lightweight web service that provides a friendly web console GUI, APIs, and a CLI tool for Kubernetes cluster lifecycle management.
KubeClipper provides flexible Kubernetes as a Service (KaaS), which allows users to rapidly deploy K8S clusters anywhere(cloud, hypervisor, bare metal) and provides persistently lifecycle management capabilities (installation, deleting, upgrading, backup and restoration, cluster scaling, remote access, plug-in management, application store).
Project Goal
Manage Kubernetes in the most lightest and convenient way.
Why do I want KubeClipper?
In the cloud-native era, Kubernetes has undoubtedly become the de facto standard for container orchestration. Although there are many tools to assist in the installation and management of kubernetes clusters, it is still very complicated to build and operate a production-level kubernetes cluster. In the process of a large number of services and practices, 99cloud has precipitated an extremely lightweight and easy-to-use graphical interface Kubernetes multi-cluster management tool - KubeClipper.
Under the premise of being fully compatible with native Kubernetes, KubeClipper is repackaged based on the kubeadm tool widely used by the community, providing rapid deployment of kubernetes clusters and persistently full life cycle management (installation, uninstallation, upgrade, scaling) in the enterprise’s own infrastructure. It supports multiple deployment methods such as online, proxy, and offline, and also provides rich and scalable management services for CRI, CNI, CSI, and various CRD components.
Compared with the existing kubernetes lifecycle management tools such as KubeKey, Kubeasz, KubeOperator, and K0S, KubeClipper is more open and native, lightweight, convenient, stable and easy to use.
Architecture
KubeClipper core components:
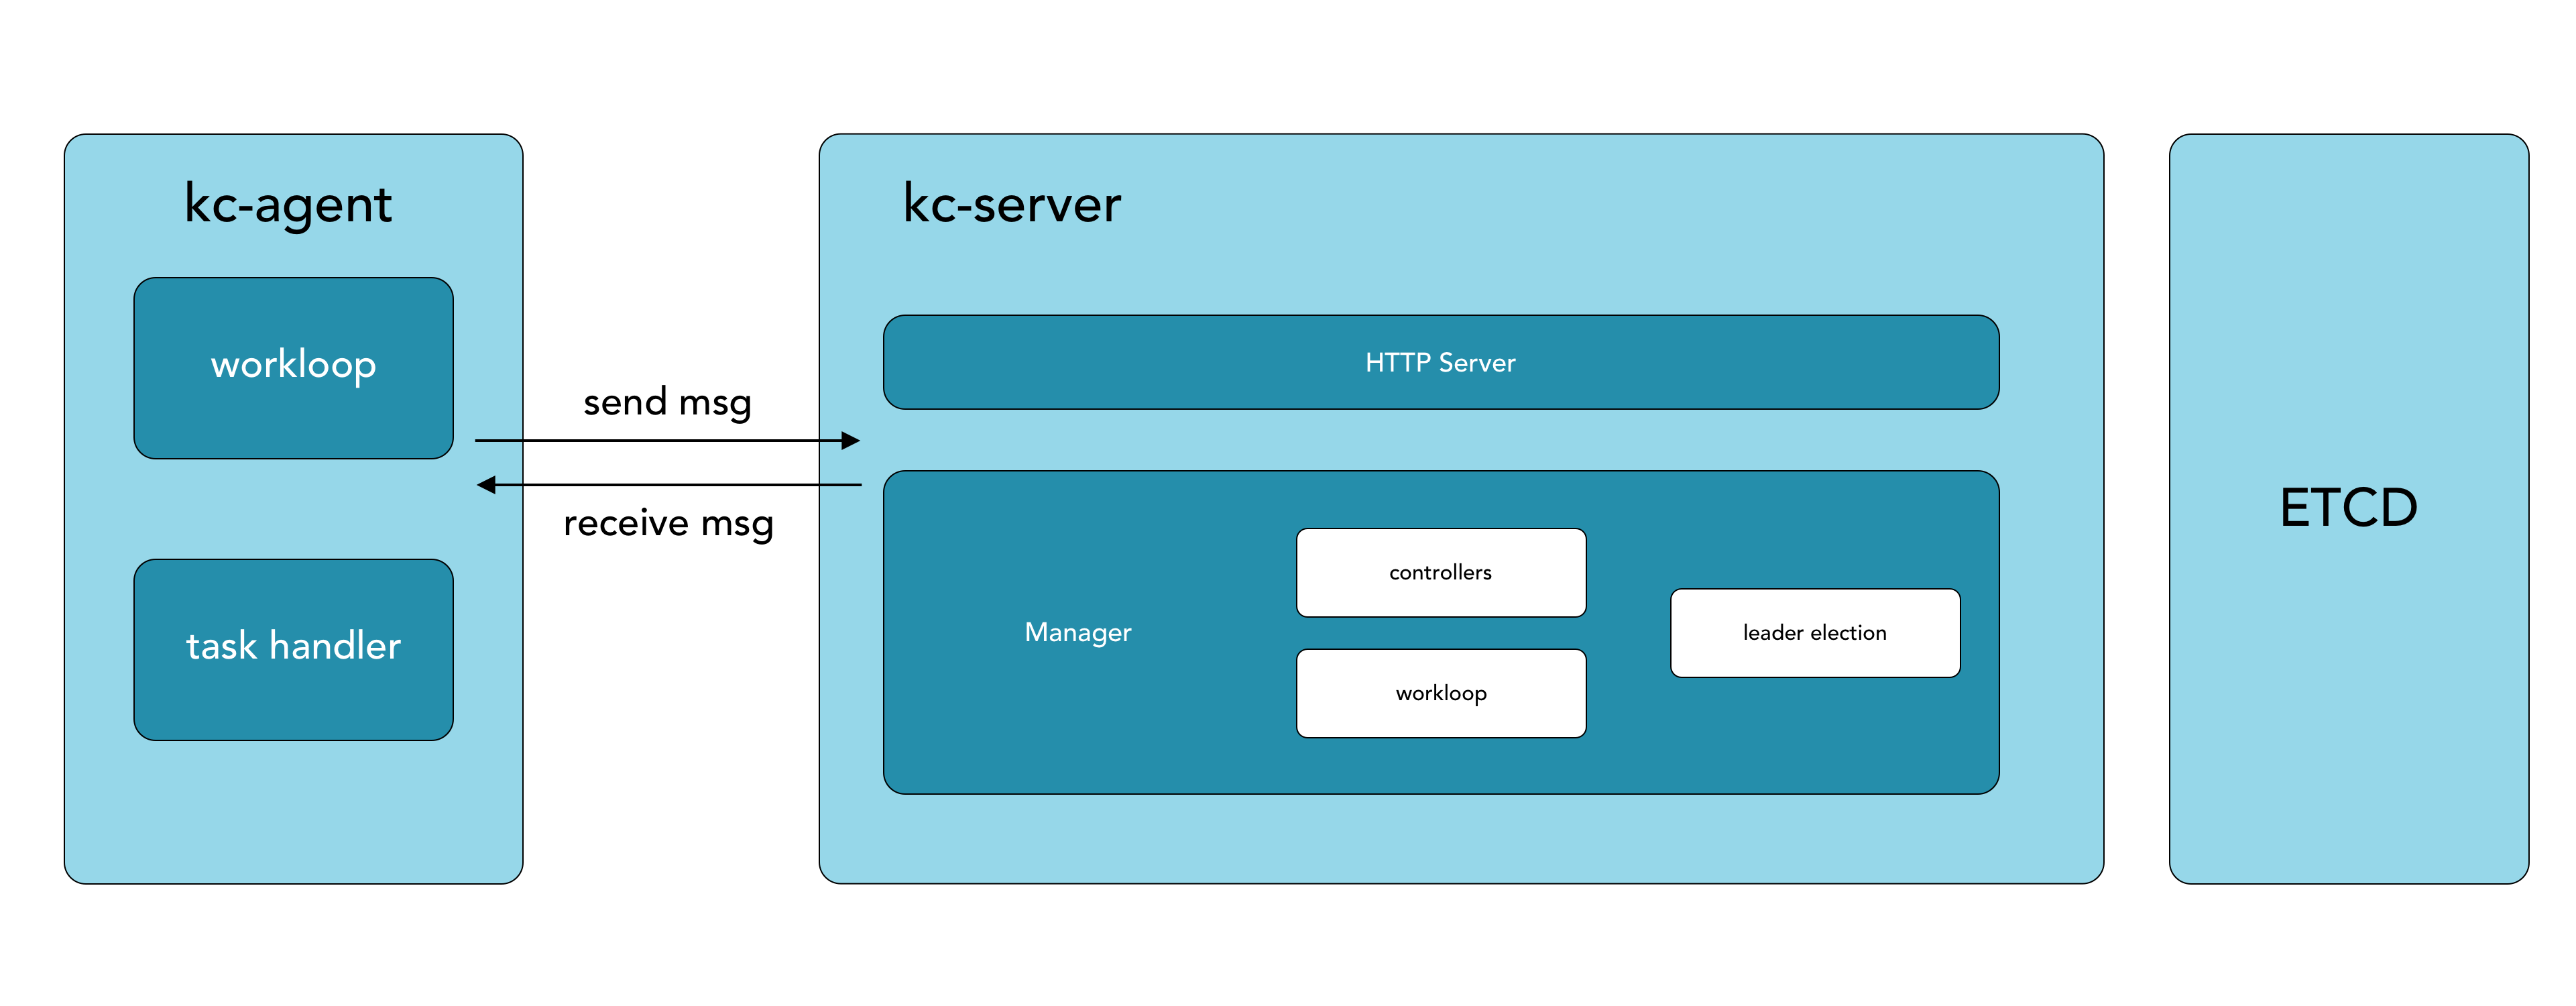
- kc-server:collecting information reported by kc-agent, distributing front-end operations to the designated kc-agent and summarizing execution results, etc., which is the core of each control of KubeClipper.
- kc-agent: Deployed on the management node, it communicates with kc-server through the message queue (built-in nats), and is responsible for reporting node information and processing and executing tasks. It is a KubeClipper node proxy tool.
- kcctl: KubeClipper’s terminal command line tool can quickly and efficiently deploy and manage KubeClipper clusters, and can replace most page operations.
Topology
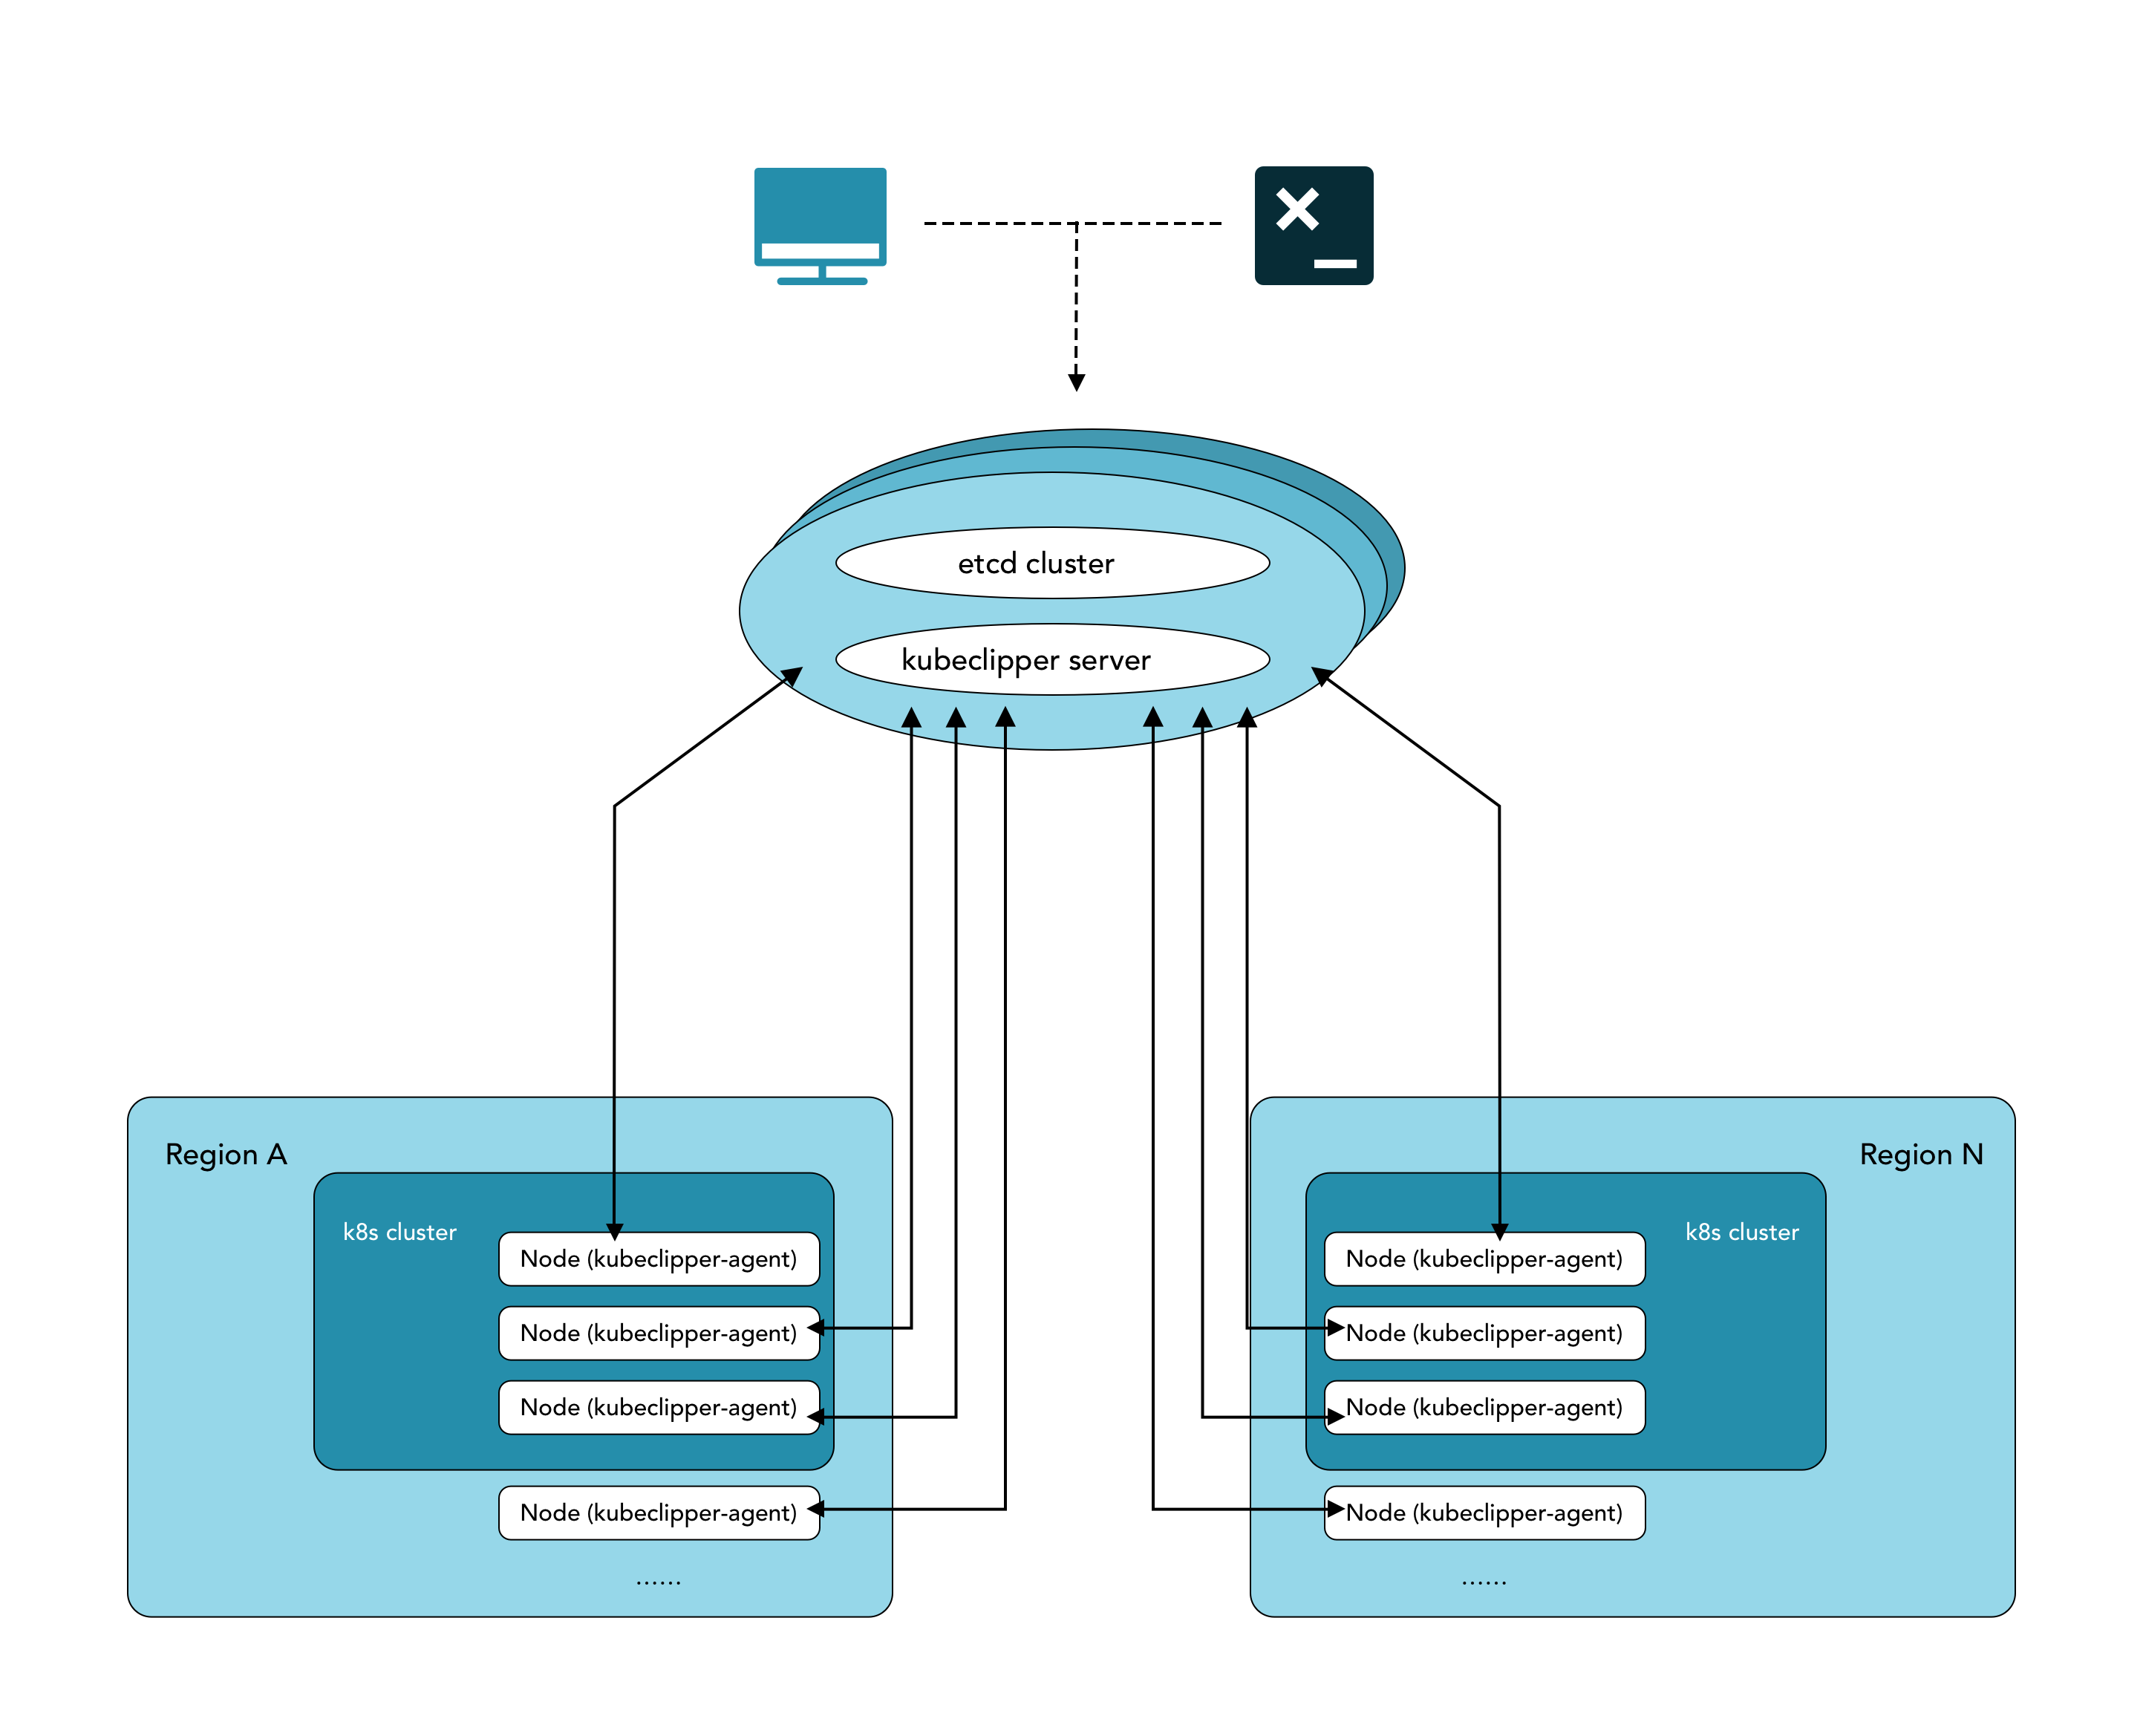
Network

Quick Start
1.1 - Feature
Cluster LifeCycle Management
- Lifecycle Management: cluster creation, deletion, backup, restoration, upgrade, and node manipulation
- Multiple Deployment Modes: online/offline deployment support
- Multi-Architecture: x86/64 & arm64 support
- Cluster Import: registration and management of external clusters (non-Kubeclipper created)
Node Management
- Automatic node registration
- Node information collection
- Node terminal
Identity and Access Management (IAM)
- RBAC-based user permission system
- OIDC integration
1.2 - Roadmap
🚀 Cluster Installation Optimization
- Use images to encapsulate installation package resources to reduce complexity. Reuse mature image technology
💻 Kubernetes Web Console
- Workload resources & monitoring presentation
- Tenant based cluster access control
📦 Application Store
- Application lifecycle management
- Support web UI & CLI interface
🧩 Common Application and Plugin Integrations
- LB & Ingress
- Monitoring
- Kubernetes Dashboard
- KubeEdge
🕸 Managed Clusters
- Support KoK clusters.
2 - Getting Started
2.1 - Deploying AIO
For users who are new to KubeClipper and want to get started quickly, it is recommended to use the All-in-One installation mode, which can help you quickly deploy KubeClipper with zero configuration.
Deploy KubeClipper
Download kcctl
KubeClipper provides a command line tool 🔧 kcctl to simplify operation and maintenance. You can download the latest version of kcctl directly with the following command:
# The latest distribution is installed by default
curl -sfL https://oss.kubeclipper.io/get-kubeclipper.sh | bash -
# Install the specified version
curl -sfL https://oss.kubeclipper.io/get-kubeclipper.sh | KC_VERSION=master bash -
#If you are in China, you can use cn environment variables during installation, in this case we will use registry.aliyuncs.com/google_containers instead of k8s.gcr.io
Curl -sfL https://oss.kubeclipper.io/get-kubeclipper.sh | KC_REGION=cn bash -
You can also download the specified version from the [GitHub Release Page] ( https://github.com/kubeclipper/kubeclipper/releases ) .
Check if the installation was successful with the following command:
kcctl version
Start installation
You can use ‘kcctl deploy’ to quickly install and deploy KubeClipper. kcctl uses SSH to access the target node where KubeClipper is finally deployed, so you need to provide SSH access credentials, and the following way to pass the credentials:
kcctl deploy [--user <username>] [--passwd <password> | --pk-file <private key path>]
Example:
# Use the private key
kcctl deploy --user root --pk-file /root/.ssh/id_rsa
# Use a password
kcctl deploy --user root --passwd password
# Deploy AIO
kcctl deploy
Execute the ‘kcctl deploy’ command kcctl will check your installation environment and will automatically enter the installation process if the conditions are met. If you see the following KubeClipper banner, the installation is successful.
 _   __      _          _____ _ _
| | / /     | |        /  __ \ (_)
| |/ / _   _| |__   ___| /  \/ |_ _ __  _ __   ___ _ __
|    \| | | | '_ \ / _ \ |   | | | '_ \| '_ \ / _ \ '__|
| |\  \ |_| | |_) |  __/ \__/\ | | |_) | |_) |  __/ |
\_| \_/\__,_|_.__/ \___|\____/_|_| .__/| .__/ \___|_|
                                 | |   | |
                                 |_|   |_|
Login to console
After the installation is complete, open a browser and visit ‘http:
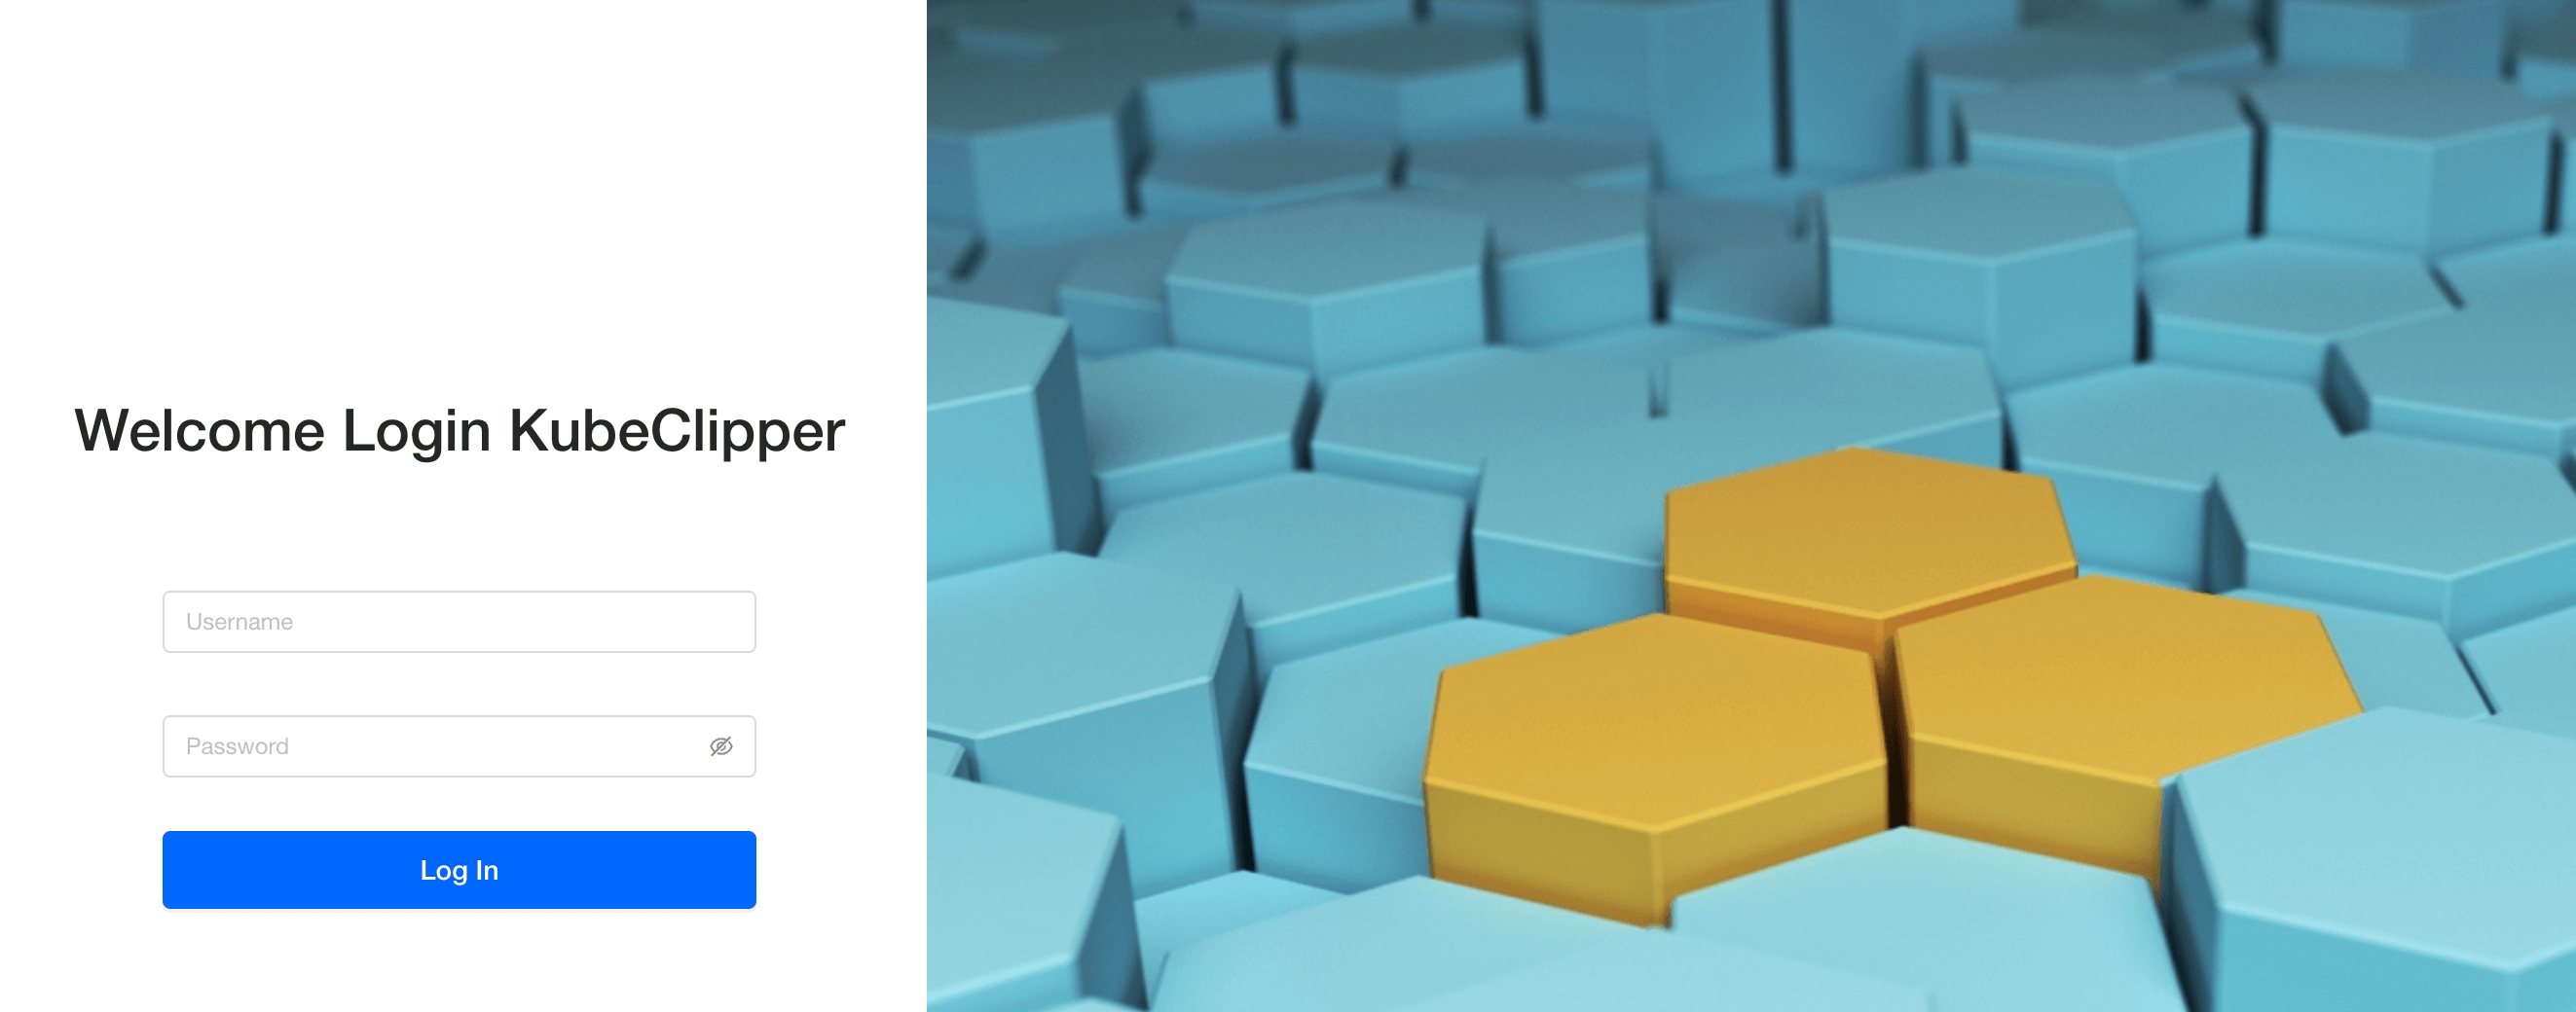
You can use the default account password " admin/Thinkbig1 " to log in.
You may need to configure port forwarding rules and open ports in security groups for external users to access the console.
Create kubernetes cluster
After successful deployment you can create a kubernetes cluster using the ** kcctl tool ** or via the ** console ** . Use the kcctl tool to create it in this quickstart tutorial.
First, use the default account password to log in and obtain the token, which is convenient for subsequent interaction between kcctl and kc-server.
kcctl login -H https://<kc-server ip address>:8080 -u admin -p Thinkbig1
Then create a Kubernetes cluster with the following command:
NODE = $ (kcctl get node -o yaml | grep ipv4DefaultIP: | sed's/ipv4DefaultIP : //')

Kcctl create cluster --master $NODE --name demo --untaint-master
It takes about 3 minutes to complete the cluster creation, or you can use the following command to view the cluster status
Kcctl get cluster -o yaml | grep status -A5
You can also go to the console to view the real-time log.
The cluster installation is complete when the cluster is in the Running state, and you can use the ‘kubectl get cs’ command to view the cluster health.
2.2 - Create kubernetes clusters offline using the kubeclipper platform
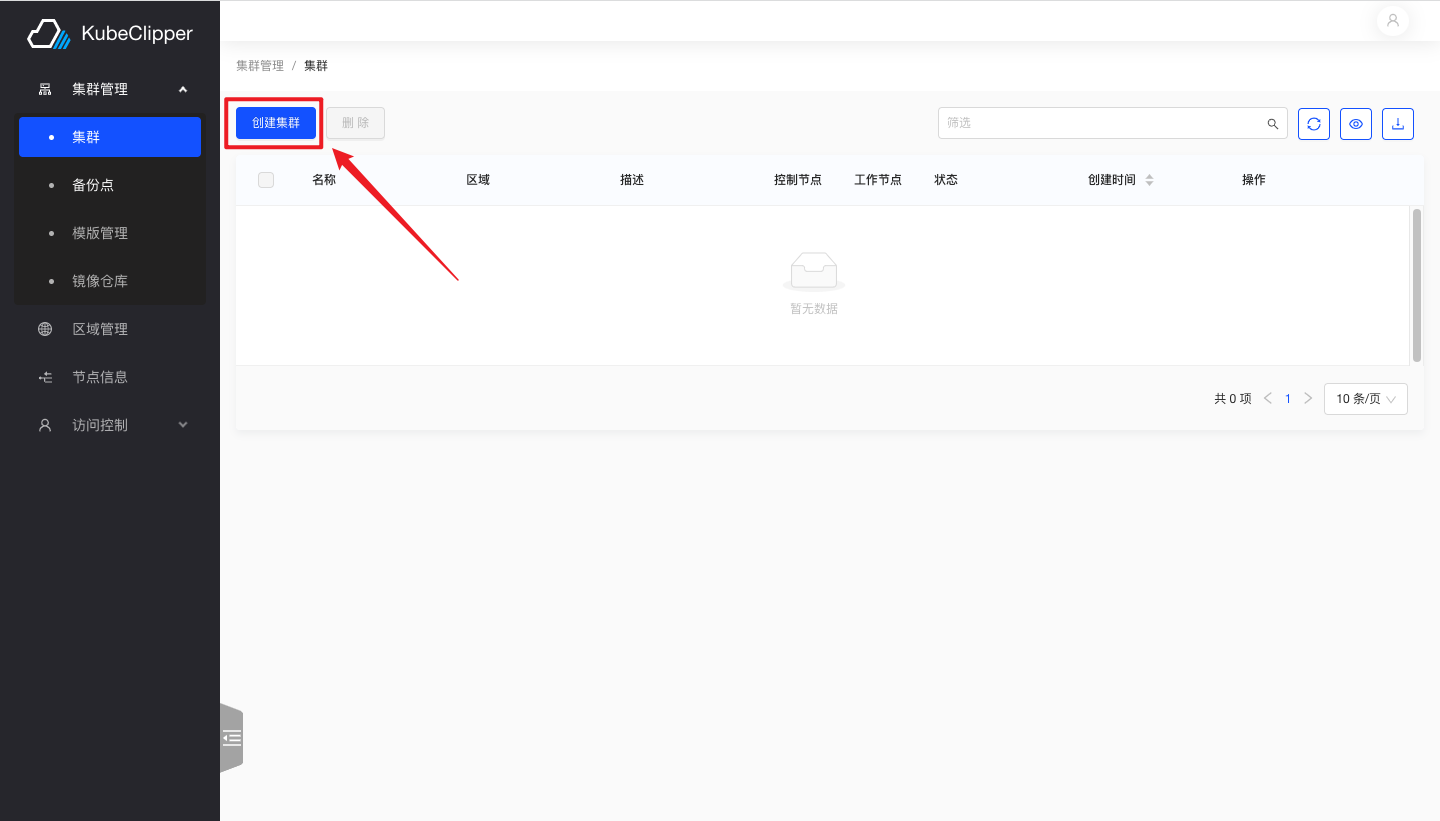
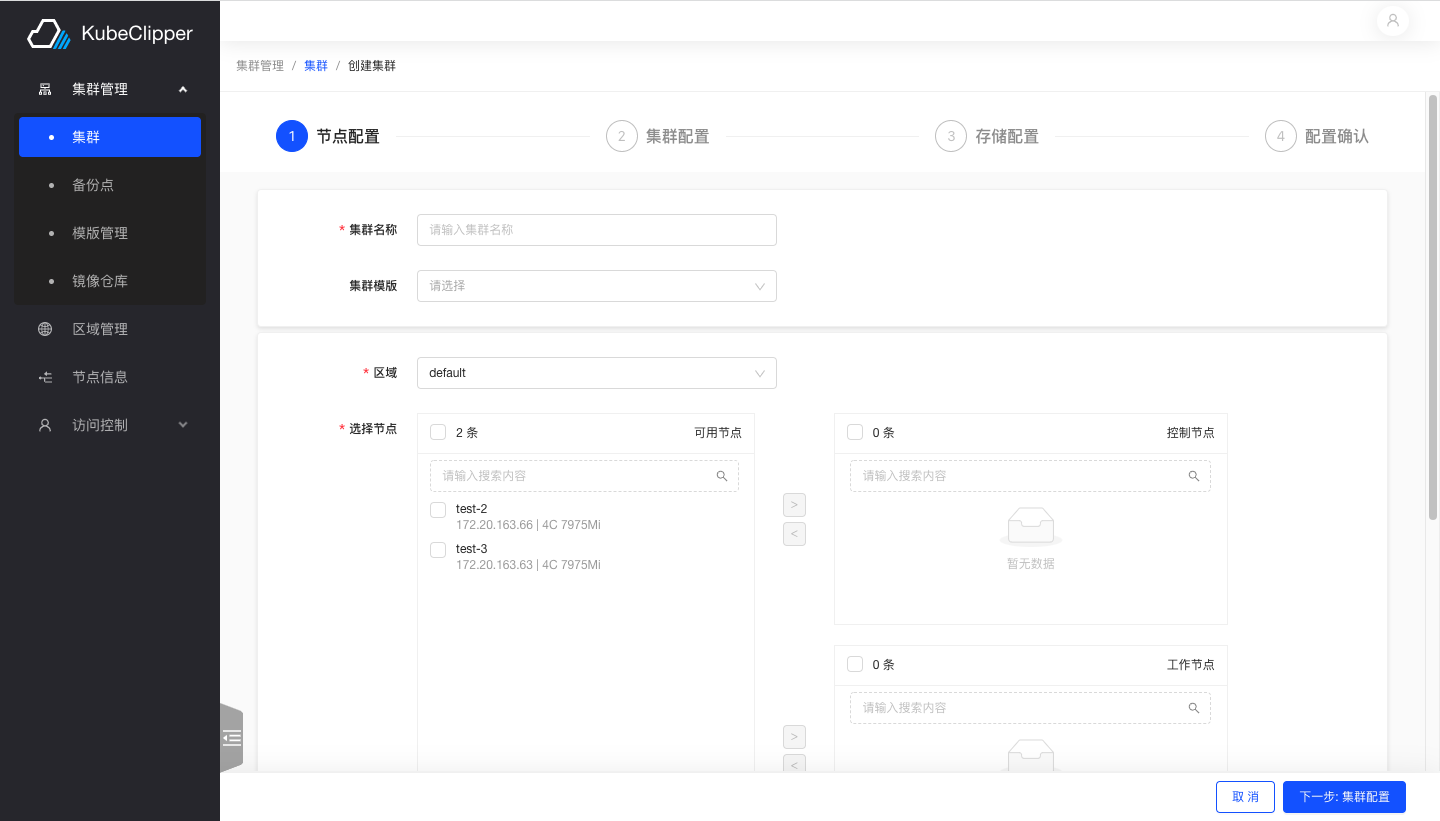
1. Go to the creation screen
Log in to the Kubeclipper platform and click the button as shown in the figure to enter the cluster creation interface
2. Configure cluster nodes
Follow the text prompts to complete the steps of entering the cluster name and selecting nodes
Note: The number of master nodes cannot be an even number.
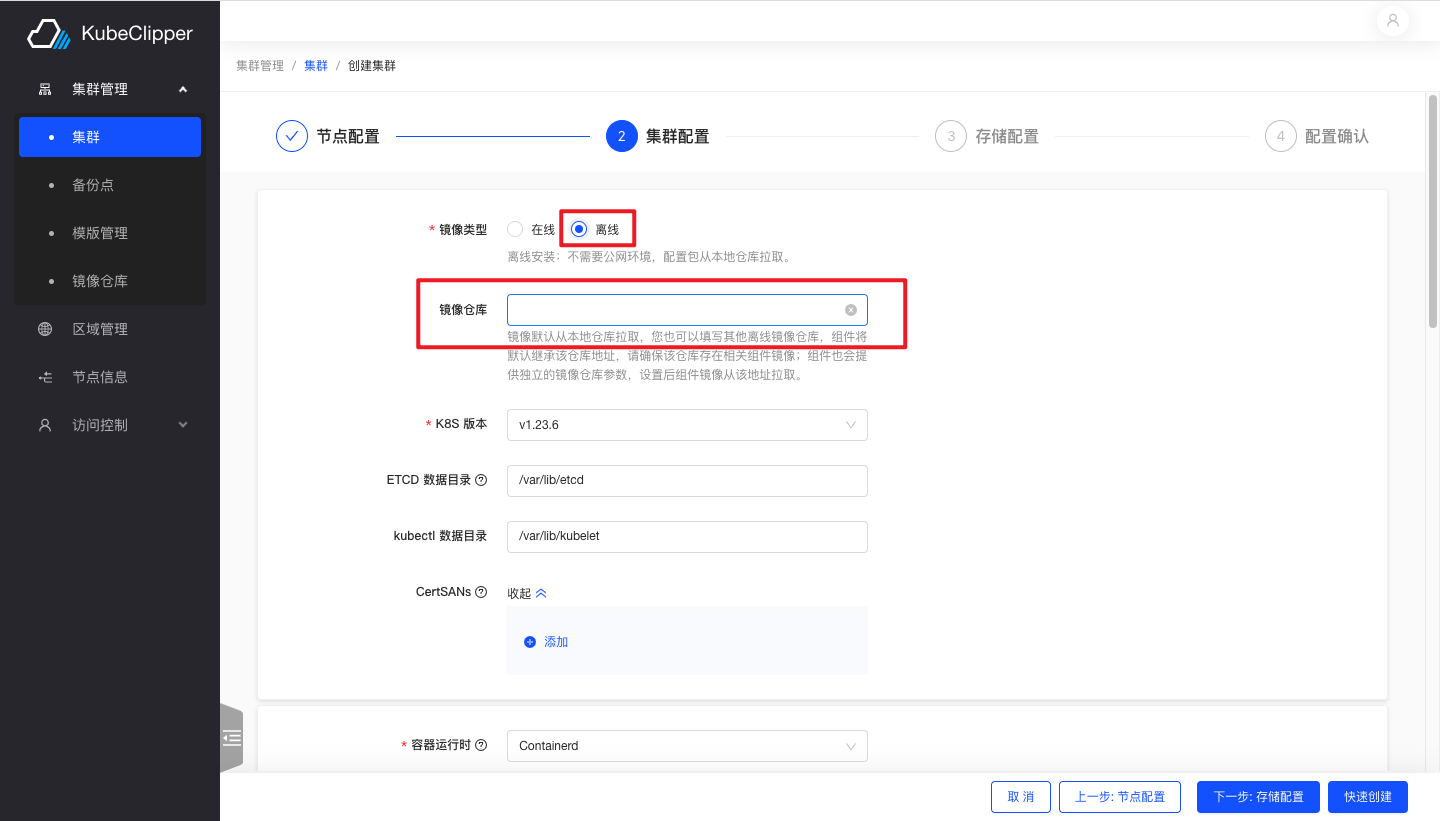
3. Configure cluster
This step is used to configure the cluster network and components such as the database and container runtime
Select offline installation and fill in the address of the image repository you have built first
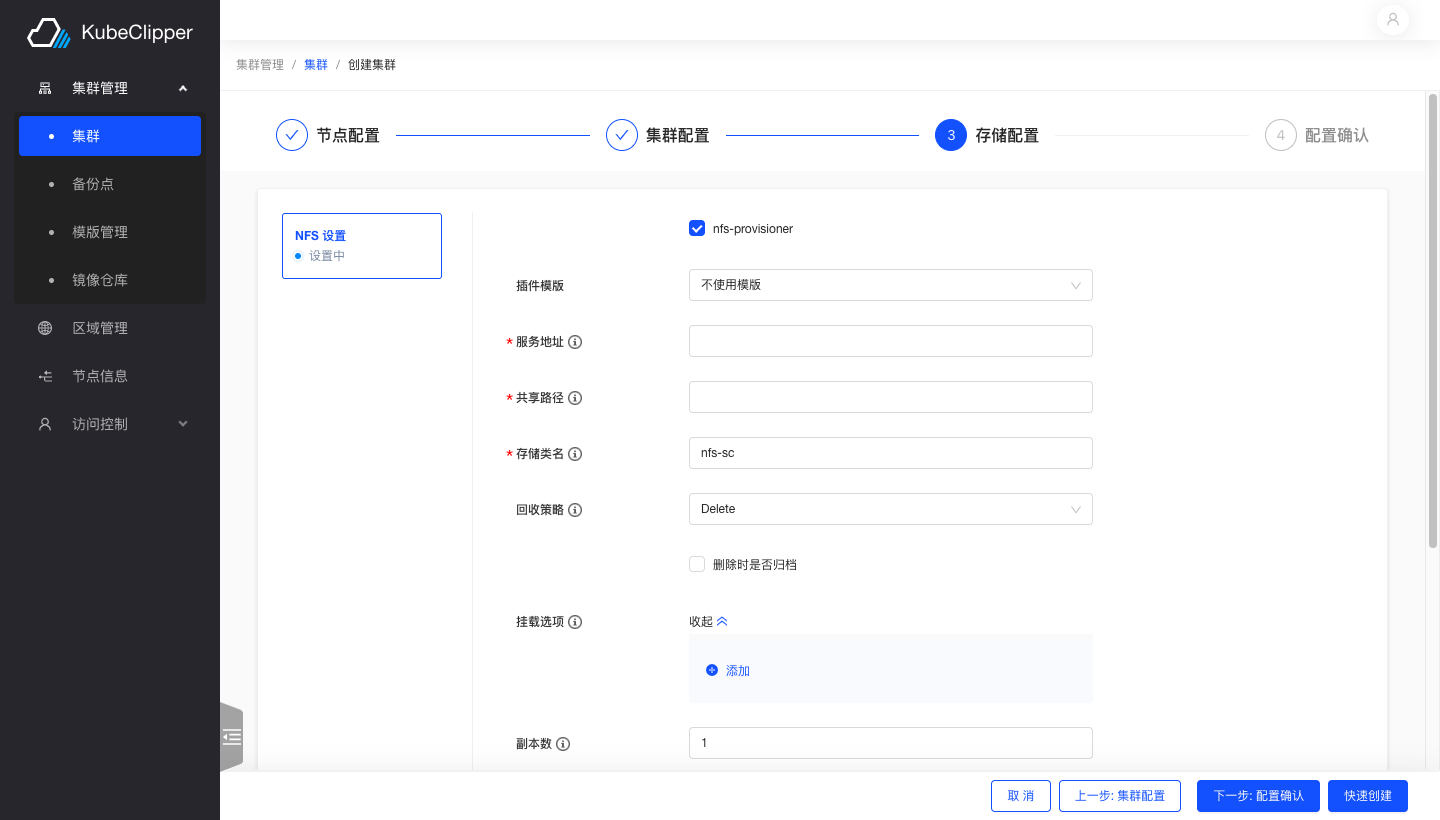
4. Configure cluster storage
Select nfs storage and follow the text prompts to fill in the appropriate fields
5. Installation completed
Complete all configurations to confirm installation
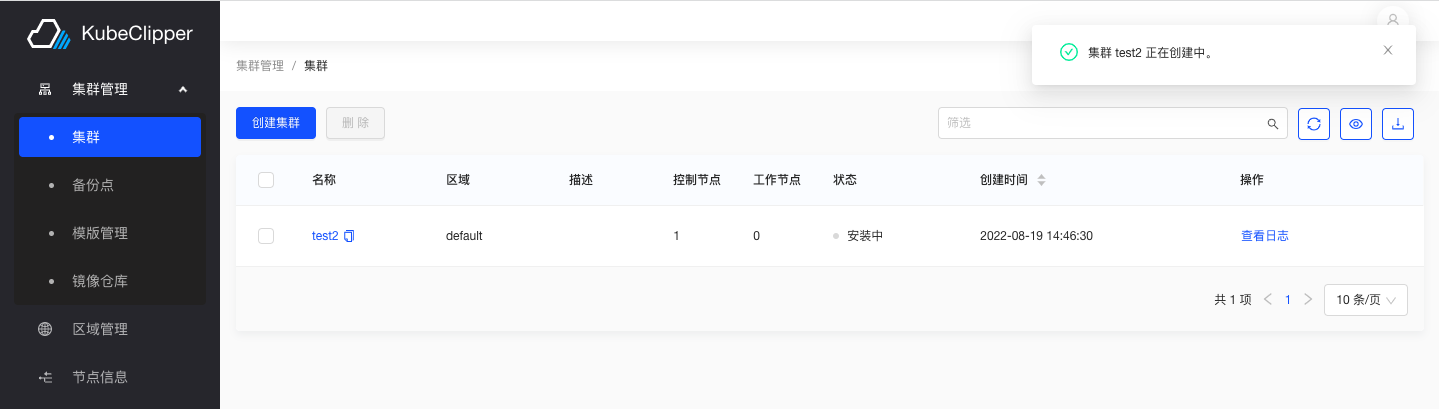
Installation is successful and the cluster is up and running
3 - Deployment docs
3.1 - Deploy Highly Available KubeClipper
For the first contact with KubeClipper, it is recommended to deploy AIO environment and quickly get started to experience the features provided by KubeClipper. If you want to apply KubeClipper to a build environment, then this document may be helpful.
Overview
According to the KubeClipper architecture design, KubeClipper has the following 4 core components:
- Kc-server: mainly includes APISERVER, controller, static resource services and built-in message queue, etc., kc-server communicates with kc-agent through message queue (supports external); kc-server has no master-slave relationship and is independent of each other; usually deployed in independent nodes to provide stable and reliable services to the outside world.
- Kc-agent: mainly includes the task processor, which is responsible for receiving the tasks delivered by the kc-server and feeding back the task processing results; usually deployed in nodes that need to install kubernetes, it is an ultra-lightweight service process.
- Kc-etcd: The backend database of kc-server, deployed on the same node as kc-server.
- Kc-dashboard: graphical management interface, deployed on the same node with kc-server. To sum up, we call the node that deploys kc-server as server, and the node that deploys kc-agent as agent.
Then the key point of deploying a highly available KubeClipper cluster is how to plan and deploy server nodes while ensuring the high availability of kc-etcd.
Generally speaking, for deploying highly available distributed application clusters, it is basically recommended to have at least 3 nodes; also for KubeClipper, 3 nodes can ensure that kc-server can still provide services after 2 nodes Downtime, and can ensure that kc-etcd will not appear Split-Brain exception.
The above brief introduction to the KubeClipper architecture and core components is to better understand how to deploy a highly available KubeClipper cluster, so as to lead to thinking about server node planning and Hardware configuration requirements.
Recommended configuration
KubeClipper as an extremely lightweight Kubernetes multi-cluster full lifecycle management tool, itself will not take up too many resources.
server node
- Quantity: 3 and more
- Hardware requirements: CPU > = 2 cores, RAM > = 2GB, hard disk > = 20GB
- System: CentOS 7.x/Ubuntu 18.04/Ubuntu 20.04
Agent node
- Quantity: any
- Hardware requirements: according to actual needs
- System: CentOS 7.x/Ubuntu 18.04/Ubuntu 20.04
Start by installing kcctl
Kcctl is a command line tool provided by KubeClipper that enables rapid deployment of KubeClipper clusters and most Kuberneters cluster management features to simplify operations.
Install kcctl:
# The latest release is installed by default
curl -sfL https://oss.kubeclipper.io/get-kubeclipper.sh | bash -

# Install the specified version
curl -sfL https://oss.kubeclipper.io/get-kubeclipper.sh | KC_VERSION=v1.3.1 bash -

# If you are in China, you can specify the KC_REGION environment variable during installation, at this time we will use registry.aliyuncs.com/google_containers instead of k8s.gcr.io
# This is very useful for online installation of k8s cluster
curl -sfL https://oss.kubeclipper.io/get-kubeclipper.sh | KC_REGION=cn bash -
After the installation is successful, the installation version and installation Path will be output.
You can also download the GitHub Release Page download the specified kcctl version
Verify installation:
kcctl version -o json

kcctl version:
{
"major": "1",
"minor": "3",
"gitVersion": "v1.3.1",
"gitCommit": "5f19dcf78d3a9dc2d1035a779152fa993e0553df",
"gitTreeState": "clean",
"buildDate": "2022-12-02T10:12:36Z",
"goVersion": "go1.19.2",
"compiler": "gc",
"platform": "linux/amd64"
}

# View help documentation
kcctl -h
Learn about the kcctl deploy command
The kcctl deploy -h command is specially used to deploy KubeClipper cluster, for more examples and parameter explanation, please execute
kcctl deploy -h
Introduction to common parameters
- –Server: IP server node, such as 192.168.10.10, 192.168.10.11, IP separated by commas.
- –Agent: Agent node IP, such as 192.168.10.10, 192.168.10.11, IP separated by commas.
- –Pk-file: ssh password-free login private key, it is recommended to use password-free login on the command line.
- –User: ssh login username, default is root.
- –Passwd: ssh login password, it is not recommended to use the password to log in at the command line.
- –Pkg: Installation package Path, support local Path and online link; get online installation package link rules: https://oss.kubeclipper.io/release/ {KC_VERSION}/kc- {GOARCH} .tar.gz . KC_VERSION for Release Version default setting current kcctl corresponding version, GOARCH is amd64 or arm64, default setting current kcctl Compilation architecture.
- –Ip-detect: Node IP discovery rules, support a variety of rules, such as specifying the name of the network interface card, etc., very useful for multiple network interface card nodes, the default is “first-found”.
After understanding the basic usage of kcctl deploy, let’s start deploying the KubeClipper cluster.
Deploy KubeClipper with kcctl
We recommend that in the multi-node installation scenario, the server nodes involved are uniformly set up password-free login to avoid password Plain Text leakage.
Deploy 3 server nodes with private key:
kcctl deploy --pk-file=~/.ssh/id_rsa \
--server SERVER_IPS \
--pkg https://oss.kubeclipper.io/release/{KC_VERSION}/kc-{GOARCH}.tar.gz
Deploy 3 server + 3 agent nodes in private key mode, specify pkg:
kcctl deploy --pk-file=~/.ssh/id_rsa \
--server SERVER_IPS \
--agent AGENT_IPS \
--pkg https://oss.kubeclipper.io/release/{KC_VERSION}/kc-{GOARCH}.tar.gz
Deploy 3 server + 3 agent nodes with private key, pkg is not specified, and the default is the same as the installed version of kcctl (recommended):
kcctl deploy --pk-file=~/.ssh/id_rsa \
--server SERVER_IPS \
--agent AGENT_IPS
Private key deployment 3 server + 3 agent node, specify etcd port, default port is client-12379 | peer-12380 | metrics-12381 :
kcctl deploy --pk-file=~/.ssh/id_rsa \
--server SERVER_IPS \
--agent AGENT_IPS \
--etcd-port 12379 --etcd-peer-port 12380 --etcd-metric-port 12381
Parameter input example:
SERVER_IPS: 192.168.10.20,192.168.10.21
AGENT_IPS: 192.168.10.30,192.168.10.31
KC_VERSION : KubeClipper release version, see GitHub Release Page
GOARCH System Architecture, AMD64 (aka x84_64), ARM64 (aka AARCH 64)
Kcctl deploy supports a variety of parameters, which can meet your specific needs for deploying KubeClipper clusters, and more functions are waiting for you to explore.
After executing the kcctl deploy command, the command will detect whether your environment meets the installation requirements, and will synchronize warning messages, installation progress, etc. to the Console. Finally, the following KubeClipper banner will be printed after the installation is successful:
 _   __      _          _____ _ _
| | / /     | |        /  __ \ (_)
| |/ / _   _| |__   ___| /  \/ |_ _ __  _ __   ___ _ __
|    \| | | | '_ \ / _ \ |   | | | '_ \| '_ \ / _ \ '__|
| |\  \ |_| | |_) |  __/ \__/\ | | |_) | |_) |  __/ |
\_| \_/\__,_|_.__/ \___|\____/_|_| .__/| .__/ \___|_|
                                 | |   | |
                                 |_|   |_|
System default management account: admin/Thinkbig1
Login to Console:
Open a browser and visit http://SERVER_IP (accessible through any Server node) to enter the KubeClipper Console
Login command line:
kcctl login -H http://SERVER_IP -u admin -p Thinkbig1
Most kcctl commands rely on login status, so it’s best to log in early when you execute the cli command.
Add agent node to KubeClipper using kcctl
The current kcctl join command only supports adding agent nodes, and will gradually support adding server nodes in the future.
Newly added agent nodes should also be uniformly set up password-free login, and the private key is the same.
Join agent node:
kcctl join --agent=AGENT_IPS
Remove agent node from KubeClipper using kcctl
The current kcctl drain command only supports deleting agent nodes, and will gradually support deleting server nodes in the future.
Drain agent node:
kcctl drain --agent=AGENT_IPS

# Force drain node, ignore errors
kcctl drain --agent=AGENT_IPS --force
If you find that KubeClipper cannot be successfully deployed according to this document, please move to the KubeClipper Github Issue to provide your comments or feedback.
4 - Tutorials
4.1 - Create clusters
Prepare to create a cluster
You need to have enough available nodes. To add nodes, refer to "Add Nodes".
Prepare the image or binary files of kubernetes, CRI, calico, CSI and other plug-ins that need to be installed. You can choose online/offline according to the network environment of the platform, and choose the recommended kubernetes version on page. You can also upload the image required for deployment to your own image repository in advance, and specify the image repository during deployment. For more installation configuration, refer to "Cluster Configuration Guide".
Create an AIO experimental cluster
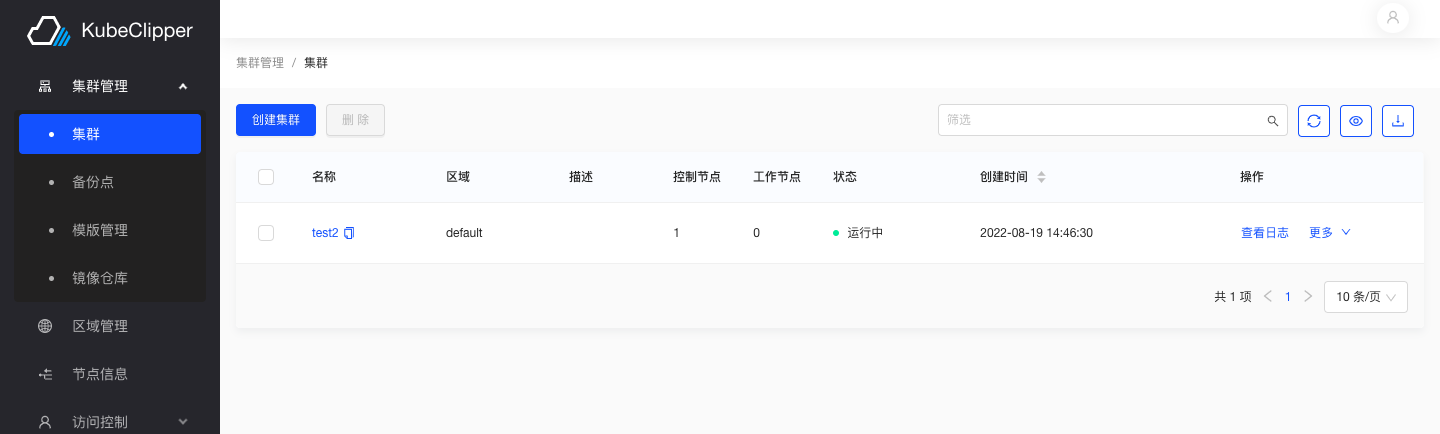
Click "Cluster Management" > "Cluster" to enter the cluster list page, and click the "Create Cluster" button in the upper left corner.
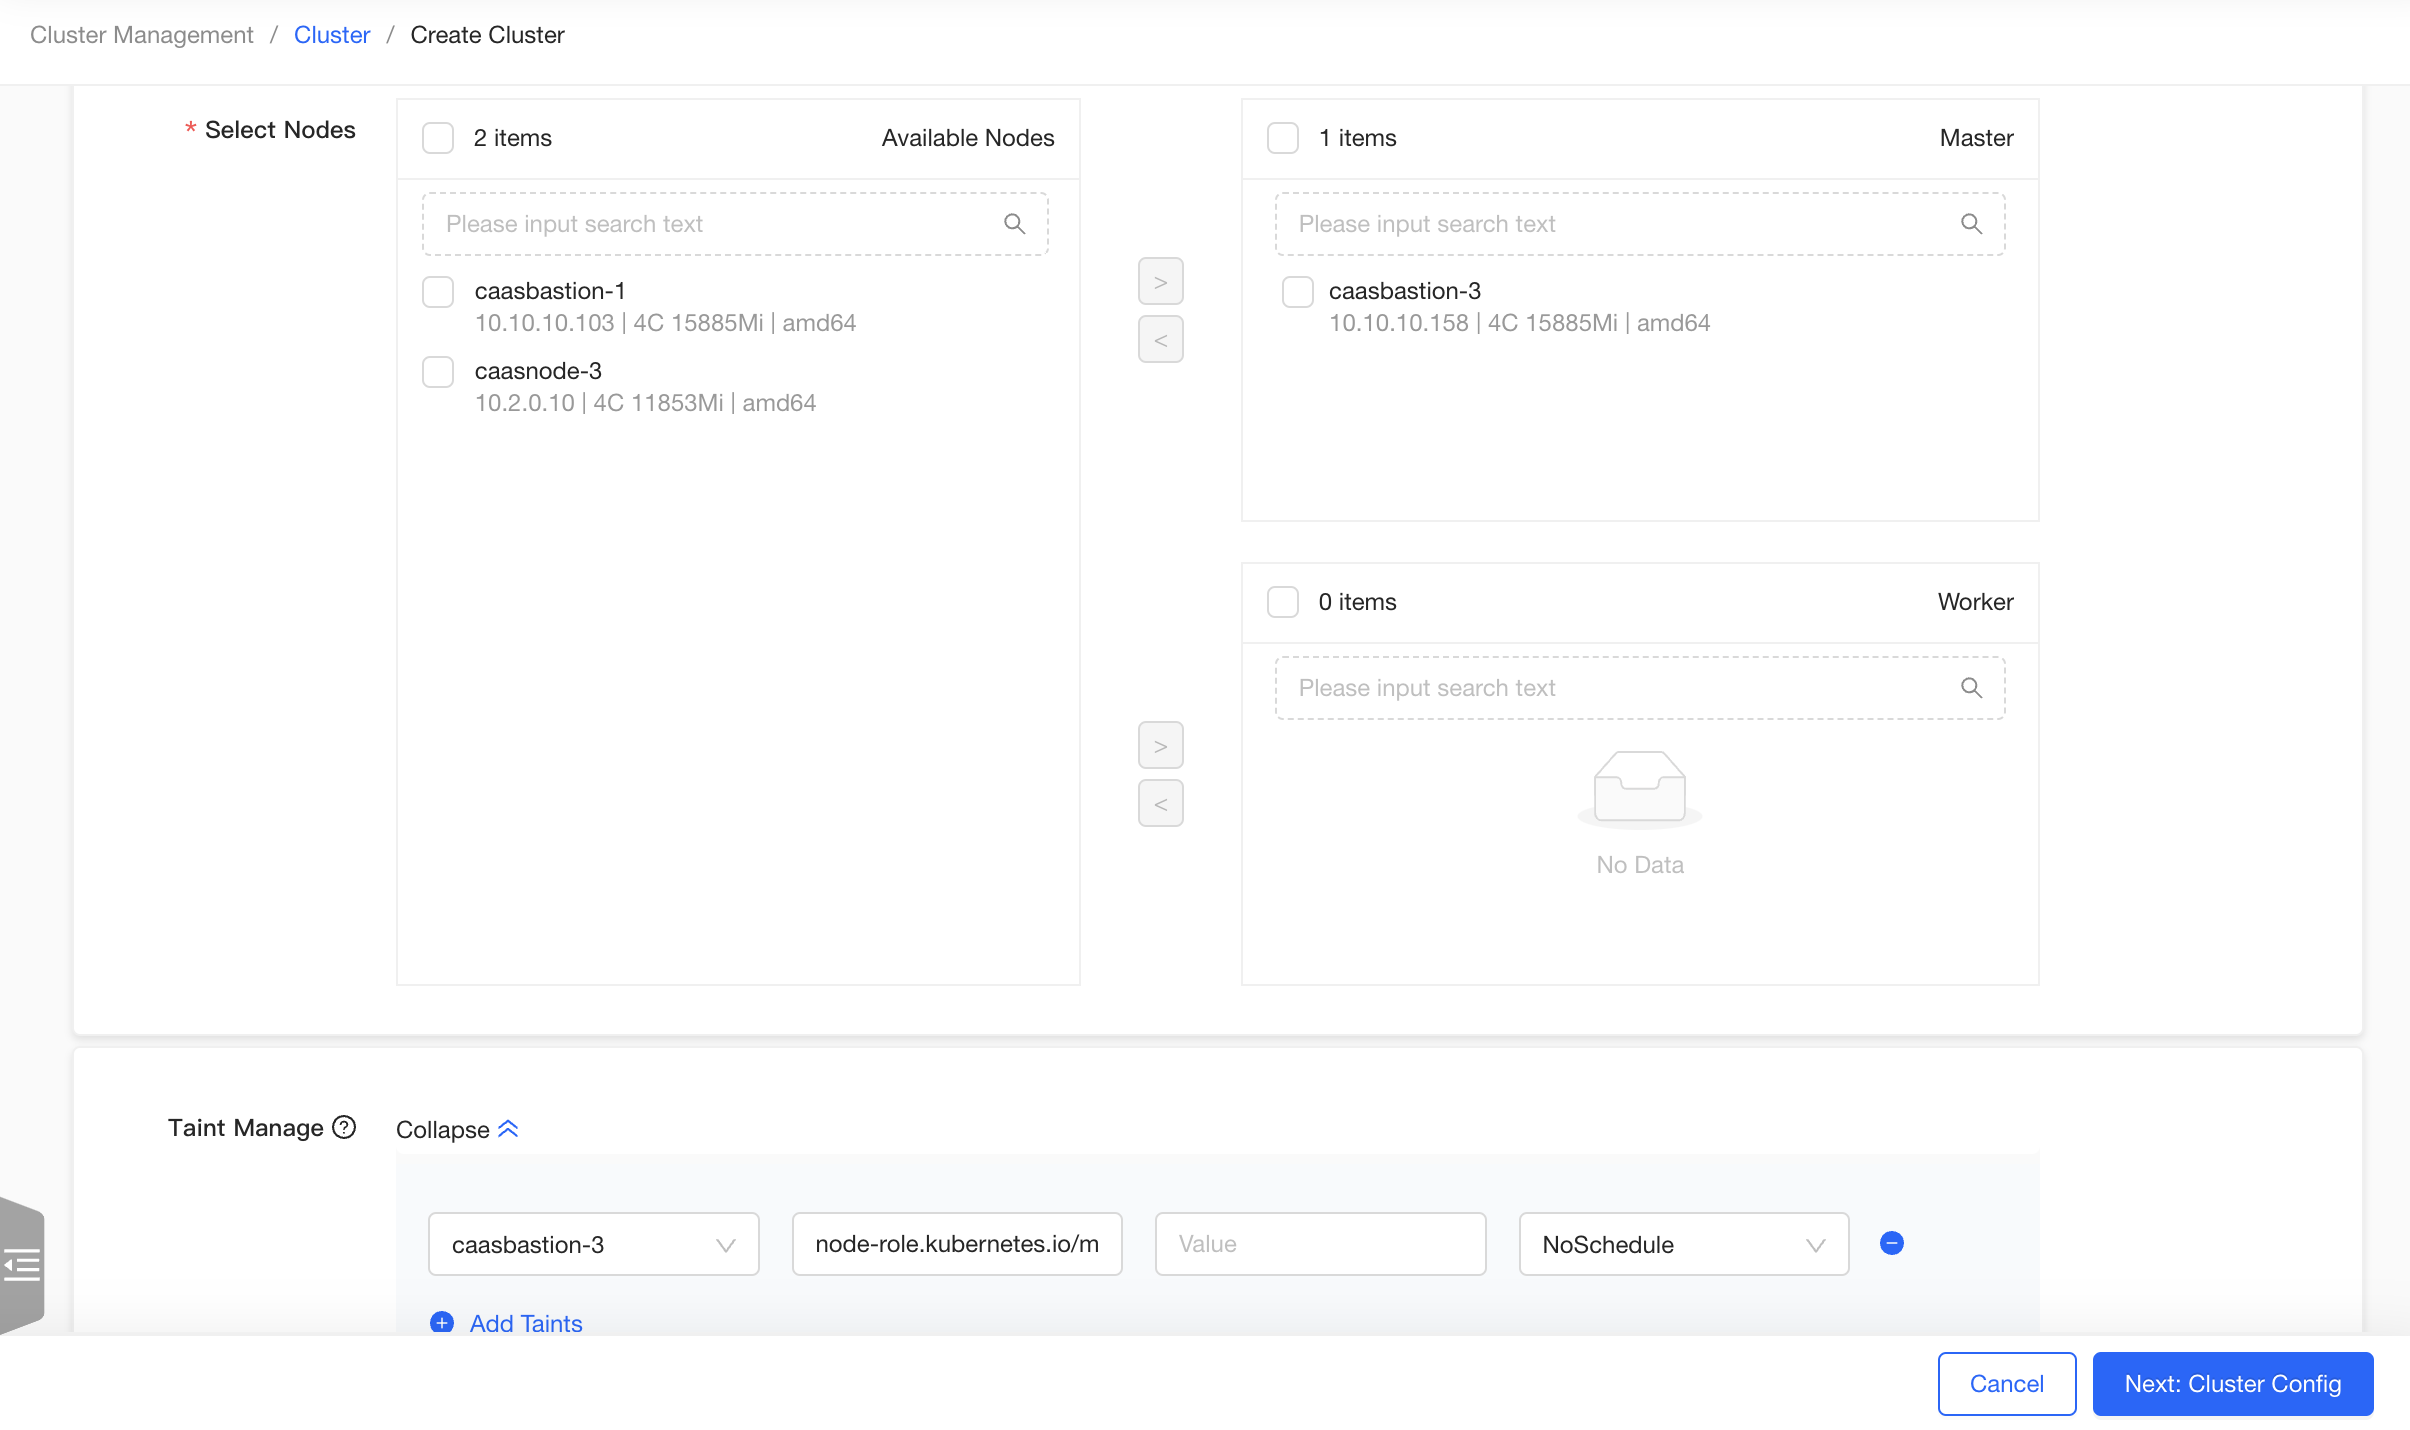
Enter the "Node Config" page of the Create Cluster Wizard page. Fill in the "Cluster Name", such as "test", without selecting "Cluster Template". Select an available node, add it as a master node, and remove the taint from the master node in the taints list. Click the "Next" button.
Enter the "Cluster Config" page. Select "Offline" for “Image Type”, retain the default values for other configurations, click the "Create Quickly" button, jump to the “Confirm Config” page, and click the "Confirm" button.
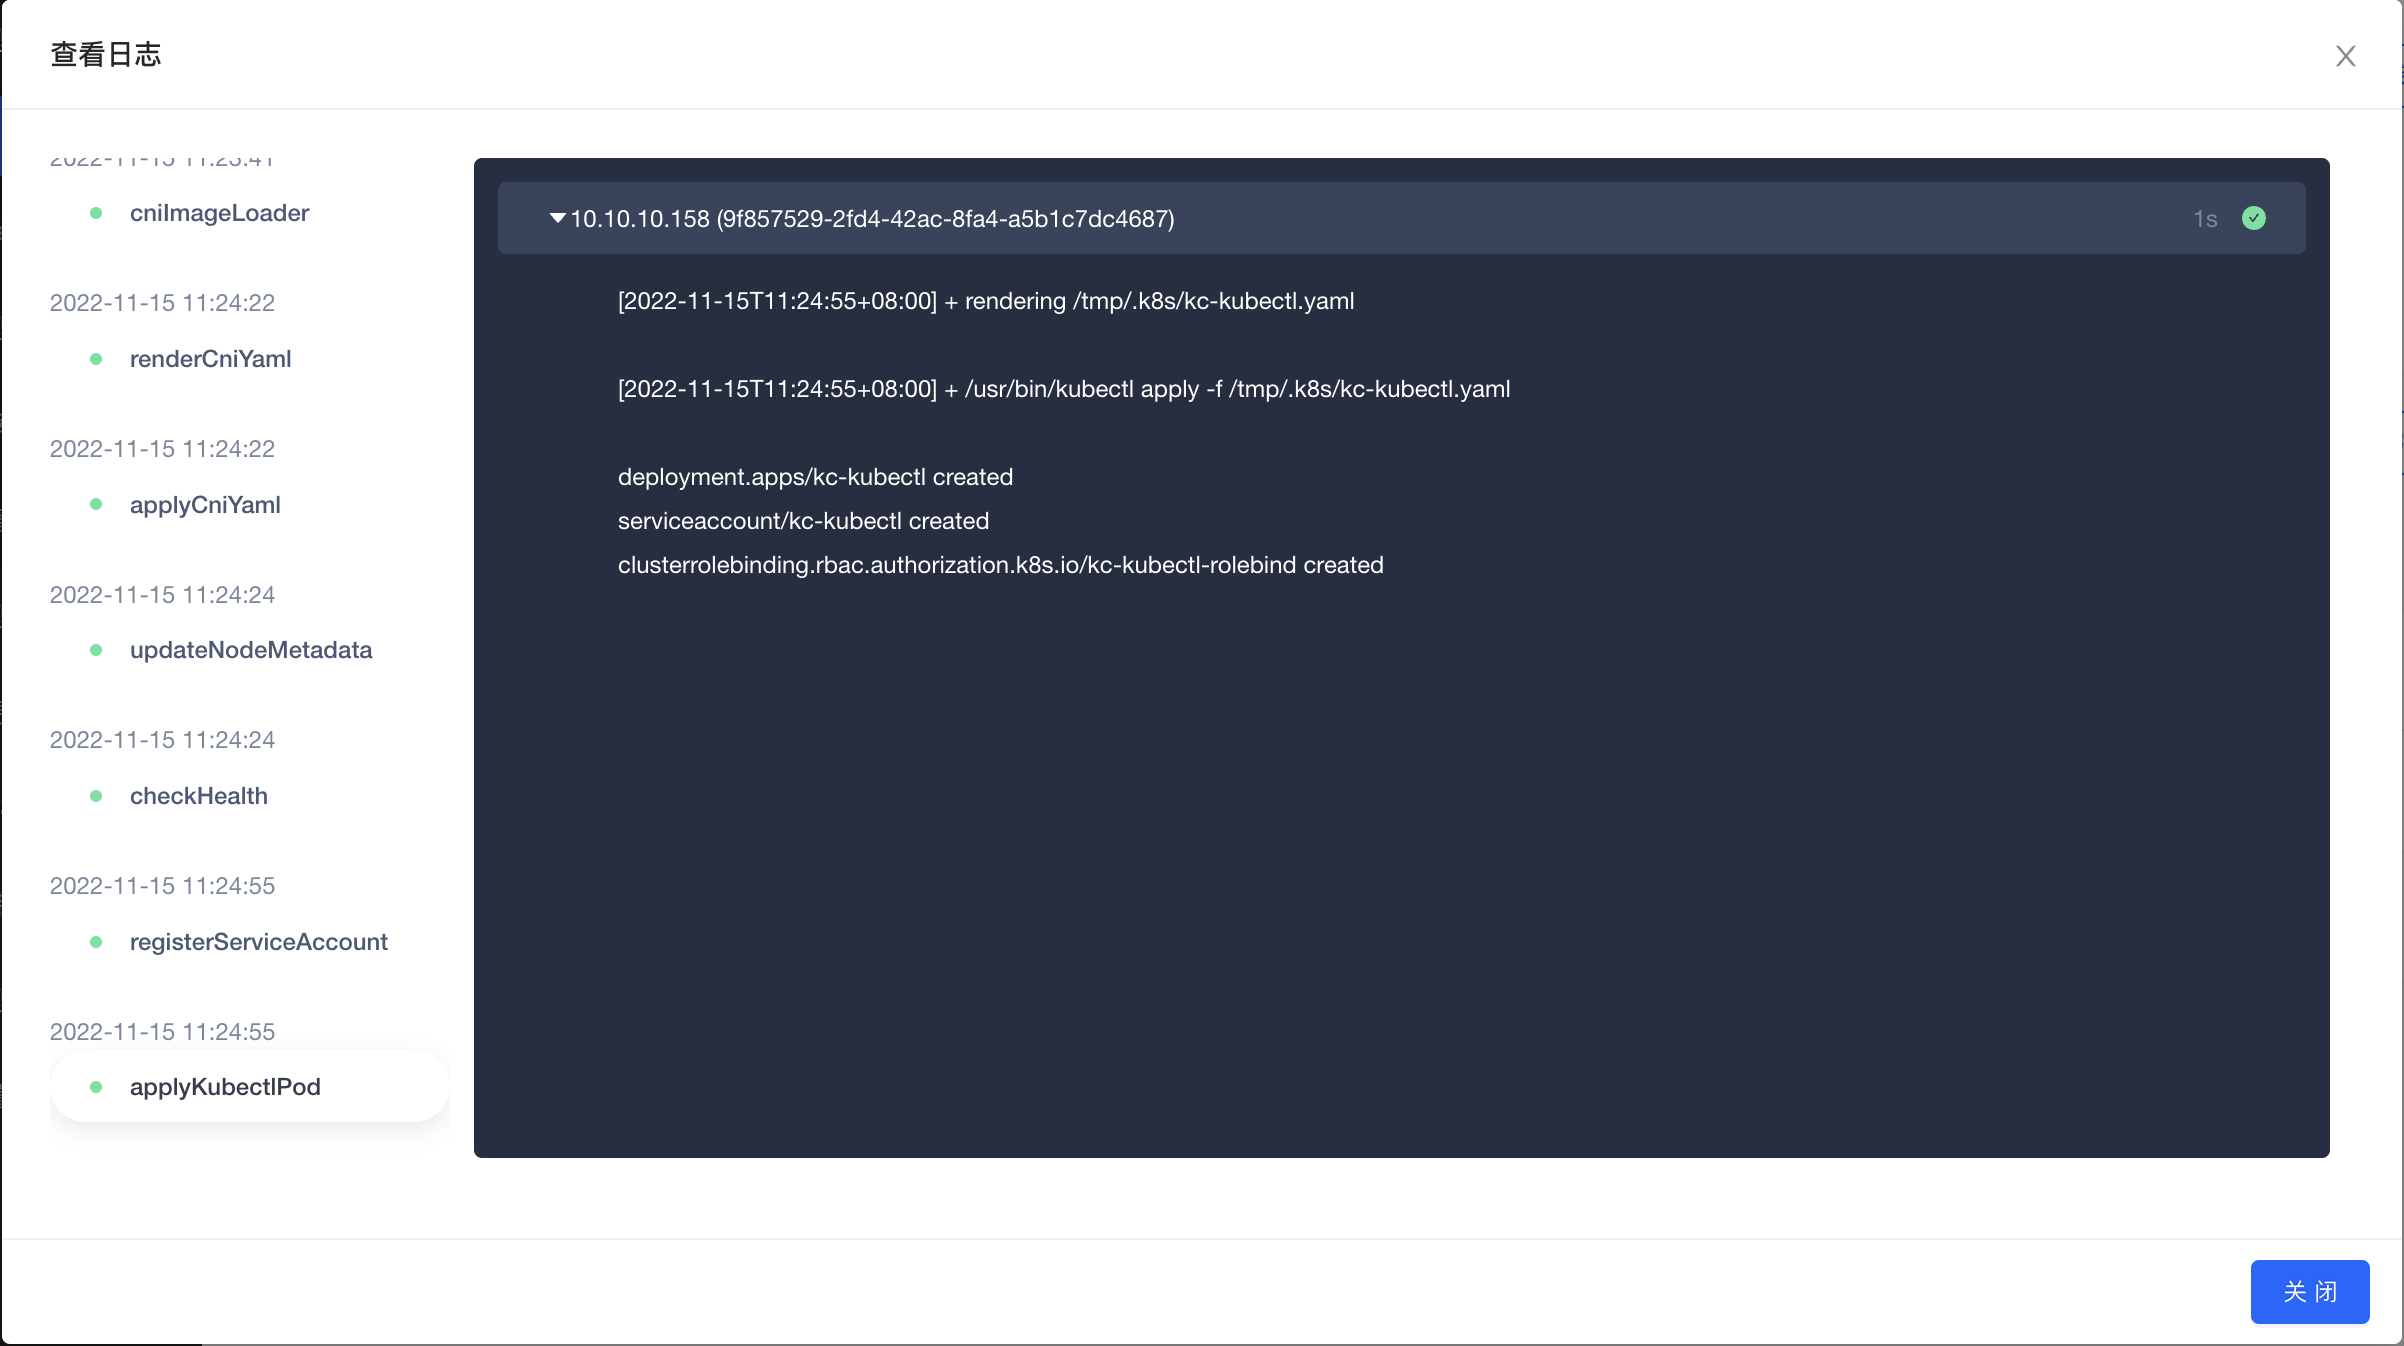
The experimental cluster of a single node is created. You can view the cluster details on the cluster details page, or click the "ViewLog" button to view the real-time log during the cluster creation process.
Create a cluster using a private registry
If you create a cluster that contains large images, it is recommended that you upload the requred images to a private registry to speed up the installing process.
Add a private registry. Click "Cluster Management" > "Registry" to enter the registry list page, and click the "Add" button in the upper left corner. In the pop-up window, enter the name and address of the registry where the images are stored, and click the "OK" button.
Create a cluster. Click "Cluster Management" > "Cluster" to enter the cluster list page, and click the "Create Cluster" button in the upper left corner. Configure the cluster nodes as needed. In the "Private Registry" of the "Cluster Config" page, select the registry added in the first step, and create the cluster after completing other configurations of the cluster as needed.
Create a cluster using the cluster template
You can use cluster templates to simplify the cluster creation process.
Add a template. There are two ways to save a template. You can add a cluster template on the "Cluster Management" > "Template Management" page, and select the template when creating a new cluster. You can also save the existing cluster configuration as a template by clicking "More" >"Cluster setings"> "Save as Template" in the cluster operation, so as to create a kubernetes cluster with the same configuration as the former cluster.
Create a cluster. Click "Cluster Management" > "Cluster" to enter the cluster list page, click the "Create Cluster" button in the upper left corner, enter the cluster creation page, fill in the "cluster name", such as "demo", select the cluster template saved in the first step. Add the required nodes, click the "Create Quickly" button in the lower right corner, jump to the "Confirm Config" page, after checking the template information, click the "Confirm" button to create a cluster.
Cluster Configuration Guide
Node configuration
On the node config page, you can configure the node as follows:
Region: The region to which the cluster belongs. When adding a node, a physical or logical region can be specified for the node. The kubernetes cluster created by the node under this region also belongs to this region. Creating a cluster with nodes from multiple regionals is not supported.
Master Nodes: Specify an odd number of master nodes for the cluster. The production environments generally use 3 master nodes to achieve high availability.
Worker nodes: Add worker nodes to the new cluster according to the business size.
Taint management: You can configure taint for added nodes, kubeclipper will automatically add noschedule taint to the master nodes, and you can also make changes as needed.
Node Labels: You can configure labels for added cluster nodes as needed.
You can configure the required nodes according to your business needs. If you need to create a non-highly available experimental cluster, you can also add only one master node, and remove the taint automatically added for the master node. For details, refer to "Creating an AIO Experimental Cluster".
Cluster configuration
On the cluster configuration page, you can configure the cluster as follows:
- Installation method and registry:
- Online: public network environment
- Offline: intranet environment
| no private registry | Specified private registry | |
|---|---|---|
| Online | Configuration package: Download from kubeclipper.io. Images: The image is pulled from the official registry by default, for example, kubernetes image pulled from k8s.gcr.io, calico pulled from docker.io. | Configuration package source: Download from kubeclipper.io. Images: Pulled from the filled private registry. The components will inherit the registry by default. Please ensure that the required images are stored in the registry. You can also set an independent registry for a specific component, and the component image will be pulled from this registry. |
| Offline | Configuration package: Download from the local kubeclipper server nodes, you can use the “kcctl resource list” command to check the available configuration packages, or use the “kcctl resource push” command to upload the required configuration packages. Images: Download from the local kubeclipper server nodes, and CRI will import the images after downloading. You can use the “kcctl resource list” command to check the available image packages, or use the “kcctl resource push” command to upload the required image packages. | Configuration package: Download from the local kubeclipper server nodes, you can use the “kcctl resource list” command to check the available configuration packages, or use the “kcctl resource push” command to upload the required configuration packages. Images: Pulled from the filled private registry. The components will inherit the registry by default. Please ensure that the required images are stored in the registry. You can also set an independent registry for a specific component, and the component image will be pulled from this address. kubeclipper provides the Docker Registry and uses the “kcctl registry” command for management. You can also use your own private registry. |
kubernetes version: Specify the cluster kubernetes version. When you choose to install offline, you can choose from the kubernetes version of the configuration packages in the current environment; when you choose to install online, you can choose from the officially recommended versions by kubeclipper.
ETCD Data Dir: You can specify the ETCD data directory, which defaults to /var/lib/etcd.
kubelet Data Dir: You can specify the ETCD data directory, which defaults to /var/lib/kubelet.
CertSANs: The IP address or domain name of the kubernetes cluster ca certificate signature, more than one can be filled in.
Container Runtime: According to the specified kubernetes version, the default container runtime is Docker for kubernetes version before v1.20.0, the default container runtime is Contianerd after v1.20.0; Docker is not supported after v1.24.0.
Container Runtime version: Specify the containerd/docker version. As with kubernetes, when you choose to install offline, you can choose from the version of the configuration package in the current environment; when you choose to install online, you can choose from the officially recommended version by kubeclipper.
Containerd data Path: The "root dir" in the config.toml configuration can be filled in. which defaults to /var/lib/containerd.
Docker data Path: The "root dir" in the daemon.json configuration can be filled in . which defaults to /var/lib/docker.
Containerd registry: The registry address where the images are stored, the "registry.mirrors" in the config.toml configuration, more than one can be filled in.
Docker registry: The registry address where the images are stored, the insecure registry in the daemon.json configuration, more than one can be filled in.
DNS domain name: The domain name of the kubernetes cluster, which defaults to cluster.local.
Worker load IP: Used for load balancing from worker nodes to multiple masters, no need to be set for a single master node cluster.
External access IP: You can fill in a floating IP for user access, which can be empty.
Backup space: Storage location of cluster backup files.
CNI configuration
The current version kubeclipper supports Calico as cluster CNI.
Calico divides the pod CIDR set by users into several blocks (network segments), dynamically allocates them to the required nodes according to business requirements, and maintains the routing table of the cluster nodes through the bgp peer in the nodes.
For example: container address pool: 172.25.0.0/16, dynamically allocated network segment pool: 172.25.0.0 - 172.25.255.192 (172.25.0.0/26 i.e. 10 bits), the number of dynamically allocated network segments: 1023, the number of pods per network segment: 61 (193-254), the total number of pods is 1023 * 61 = 62403, the relative maximum number of nodes (according to the 200 service pod as the reference value): 312.
Clusters larger than 50 nodes are currently not recommended. Clusters larger than 50 nodes are recommended to manually configure route reflection to optimize the stability of routing table maintenance for nodes in the cluster.
To use Calico as the cluster CNI, you need the following configuration:
- Calico mode: 5 network modes are supported:
- Overlay-IPIP-All: Use IP-in-IP technology to open up the network of pods of different nodes. Usually, this method is used in the environment where the underlying platform is IaaS. Of course, if your underlying network environment is directly a physical device, it is also completely can be used, but the efficiency and flexibility will be greatly reduced. It should be noted that you need to confirm that the underlying network environment (underlay) supports the IPIP protocol. (The network method using overlay will have a certain impact on network performance).
- Overlay-Vxlan-All: Use IP-in-IP technology to open up the network of pods of different nodes. Usually, this method is used in the environment where the underlying platform is IaaS. Of course, if your underlying network environment is directly a physical device, it is also completely can be used, but the efficiency and flexibility will be greatly reduced. In theory, it can run on any network environment. Usually, we will use it when the underlying environment does not support the IPIP protocol. (The network method using overlay has a certain impact on network performance).
- BGP : Use IP-in-IP technology to open up the network of pods of different nodes. Usually this method is used in a bare metal environment. Of course, if the Iaas platform supports BGP, it can also be used. In this mode, the IP communication of pods is accomplished by exchanging routing tables among nodes in the cluster. If you need to manually open up the pod network between multiple clusters, you need to pay attention that the addresses you assign should not conflict.
- Overly-IPIP-Cross-Subnet: Use IP-in-IP technology to open up the network of pods of different nodes. Usually this method is used in the environment where the underlying platform is IaaS . It should be noted that you need to confirm the underlying network environment (underlay) supports the IPIP protocol. The difference with Overlay-IPIP-All is that if two upper Pods of different nodes in the same network segment communicate with each other through the routing table, the efficiency of upper Pods of different nodes in the same network segment can be improved.
- Overly-Vxlan-Cross-Subnet: The logic is similar to that of Overly-IPIP-Cross-Subnet.
- IP version: The IP version can be specified as IPV4 or IPV4 IPV6 dual stack.
- Service subnet: Fill in the service subnet CIDR, v4 defaults to: 10.96.0.0/16, v6 defaults to fd03::/112, note that the Service network must not overlap with any host network.
- Pod CIDR: Fill in the pod subnet CIDR, v4 default: 172.25.0.0/24, v6 default is fd05::/120, note that the Pod network must not overlap with any host network.
- The bottom layer of the pod network:
- First-found (default): The program will traverse all valid IP addresses (local, loop back, docker bridge, etc. will be automatically excluded) according to ipfamily (v4 or v6). Usually, if it is a multi-network interface card, it will exclude the default gateway. The network interface card ip other than the gateway will be used as the routing address between nodes.
- Can-reach: Set the routing address between nodes by checking the reachability of the domain names or IP addresses.
- Interface: Get all network interface card device names that satisfy the regular expression and return the address of the first network interface card as the routing address between nodes.
- MTU: Configure the maximum transmission unit (MTU) for the Calico environment. It is recommended to be no larger than 1440. The default is 1440. See https://docs.projectcalico.org/networking/mtu for details.
Storage configuration
The current version of Kubeclipper supports NFS as external storage types.
- Connect to NFS storage
For NFS type external storage, you need to set the following:
| Field | Function description | description/optional |
|---|---|---|
| ServerAddr | ServerAddr, the service address of NFS | Required |
| SharedPath | SharedPath, the service mount path for NFS | Required |
| StorageClassName | StorageClassName, the name of the storage class | The default is nfs-sc, the name can be customized, and it cannot be repeated with other storage classes in the cluster |
| ReclaimPolicy | ReclaimPolicy, VPC recovery strategy | Delete/Retain |
| ArchiveOnDelete | ArchiveOnDelete, whether to archive PVC after deletion | Yes/No |
| MountOptions | MountOptions, the options parameter of NFS, such as nfsvers = 4.1 | Optional, you can fill in several |
| Replicas | Replicas, number of NFS provisioners | Default is 1 |
After setting up the external storage, the card below will show the storages you have enabled. You can choose a storage class as the default storage. For PVCs that do not specify a specific StorageClass, the default storage class will be used.
Configuration Confirm
You can check the cluster configuration information on the Confirm Config page. After confirming the information, click Confirm. You can also click the “Edit” button of each card to skip back to the corresponding step to modify the cluster information.
The cluster installation may take several minutes. You can check the operation logs on the cluster detail page to track the cluster installation status.
4.2 - Cluster hosting
Kubeadm cluster hosting
For a host cluster created and managed by kubeadm, kubeclipper gets the cluster and node information from the kubeconfig file and imports it into the kubeclipper platform.
Click “Cluster Management” > “Cluster Hosting” button to enter the cluster hosting page. Click “Add” button at the upper left corner. In the pop-up window of Add Provider, fill in the provider name (such as kubeadm-demo) and description, and then fill in the following information:
Region: The region of the cluster and node in the kubeclipper platform.
Provider type: Select kubeadm.
SSH: Specifies the connection method of cluster nodes. Private Key or Password can be selected. Ensure that all cluster nodes can be connected through the selected method.
- Private Key: enter the node user name and private key information.
- Password: enter the node user name and password.
Cluster name: Specifies the display name on the platform and cannot be the same as any other clusters.
KubeConfig: The KubeConfig file of the host cluster.
Click the “OK” button to import the cluster and node into the platform. Click the provider name (kubeadm-demo) to enter the Provider detail page, where you can view the cluster under the provider and perform the following operations on the provider:
- Synchronization: Kubeclipper synchronizes cluster information every four hours. You can also click “Synchronize” to manually perform the operation.
- Edit: Edit the provider’s name, description, access information, and node connection method.
- Remove: Remove the cluster information from kubeclipper, but the cluster will not be uninstalled.
Managed cluster management
You can choose “Cluster Management” > “Cluster” to go to the cluster list page and view the list of all clusters, including hosted clusters and local clusters. The following table lists the operations supported by different clusters:
Note that “docker.io” will be used as image resource by default when you install external storage and other plug-ins for host clusters. If you are in an offline environment, you need to fill in the address of the accessible private registry during plug-in installation. The private registry must be added to the CRI registry of the cluster. For details, refer to CRI Registry.
| Function | Clusters created by Kubeclipper | Hosted kubeadm cluster |
|---|---|---|
| View log | ✔ | ✔ |
| Retry after failed task | ✔ | ✔ |
| Access Kubectl | ✔ | ✔ |
| Edit | ✔ | ✔ |
| Save as template | ✔ | ✘ |
| CRI Registry | ✔ | ✔ |
| Add/remove cluster nodes | ✔ | ✔ |
| Cluster Backup and Recovery | ✔ | ✔ |
| Version Upgrade | ✔ | ✘ |
| Delete cluster | ✔ | ✘ |
| Remove cluster (provider) | / | ✔ |
| Reset status | ✔ | ✔ |
| Cluster plugin management | ✔ | ✔ |
| Update cluster certificate | ✔ | ✔ |
| View kubeconfig file | ✔ | ✔ |
4.3 - Cluster management
View Cluster operations
On the cluster details page, click the "Operation Log" tab to see the cluster operation records. Click the "ViewLog" button on the right side to inspect the detailed logs of all steps and nodes in the pop-up window. Click the step name on the left to inspect the detailed log of the execution steps.
During the execution of cluster operations, you can inspect real-time log updates to trace the operation execution. For operations that failed to execute, you can also locate error by red dot under the step name, and troubleshoot the cause of the operation failure.
Try again after failed task
If the task failed but you do not need to modify the task parameters after troubleshooting, you can click “Retry” on the right of the operation record to retry the task at the breakpoint.
Note: The retry operation is not universal. You need to determine the cause of the task failure by yourself.
After cluster operation (such as creation, restoration, and upgrade) failure, the cluster status may be displayed as “xx failed” and other operations cannot be performed. If the operation can not be retrayed successflly. You need to refer to the O&M document to manually rectify the cluster error, and click More > Cluster Status > Reset Status to reset the cluster to normal status.
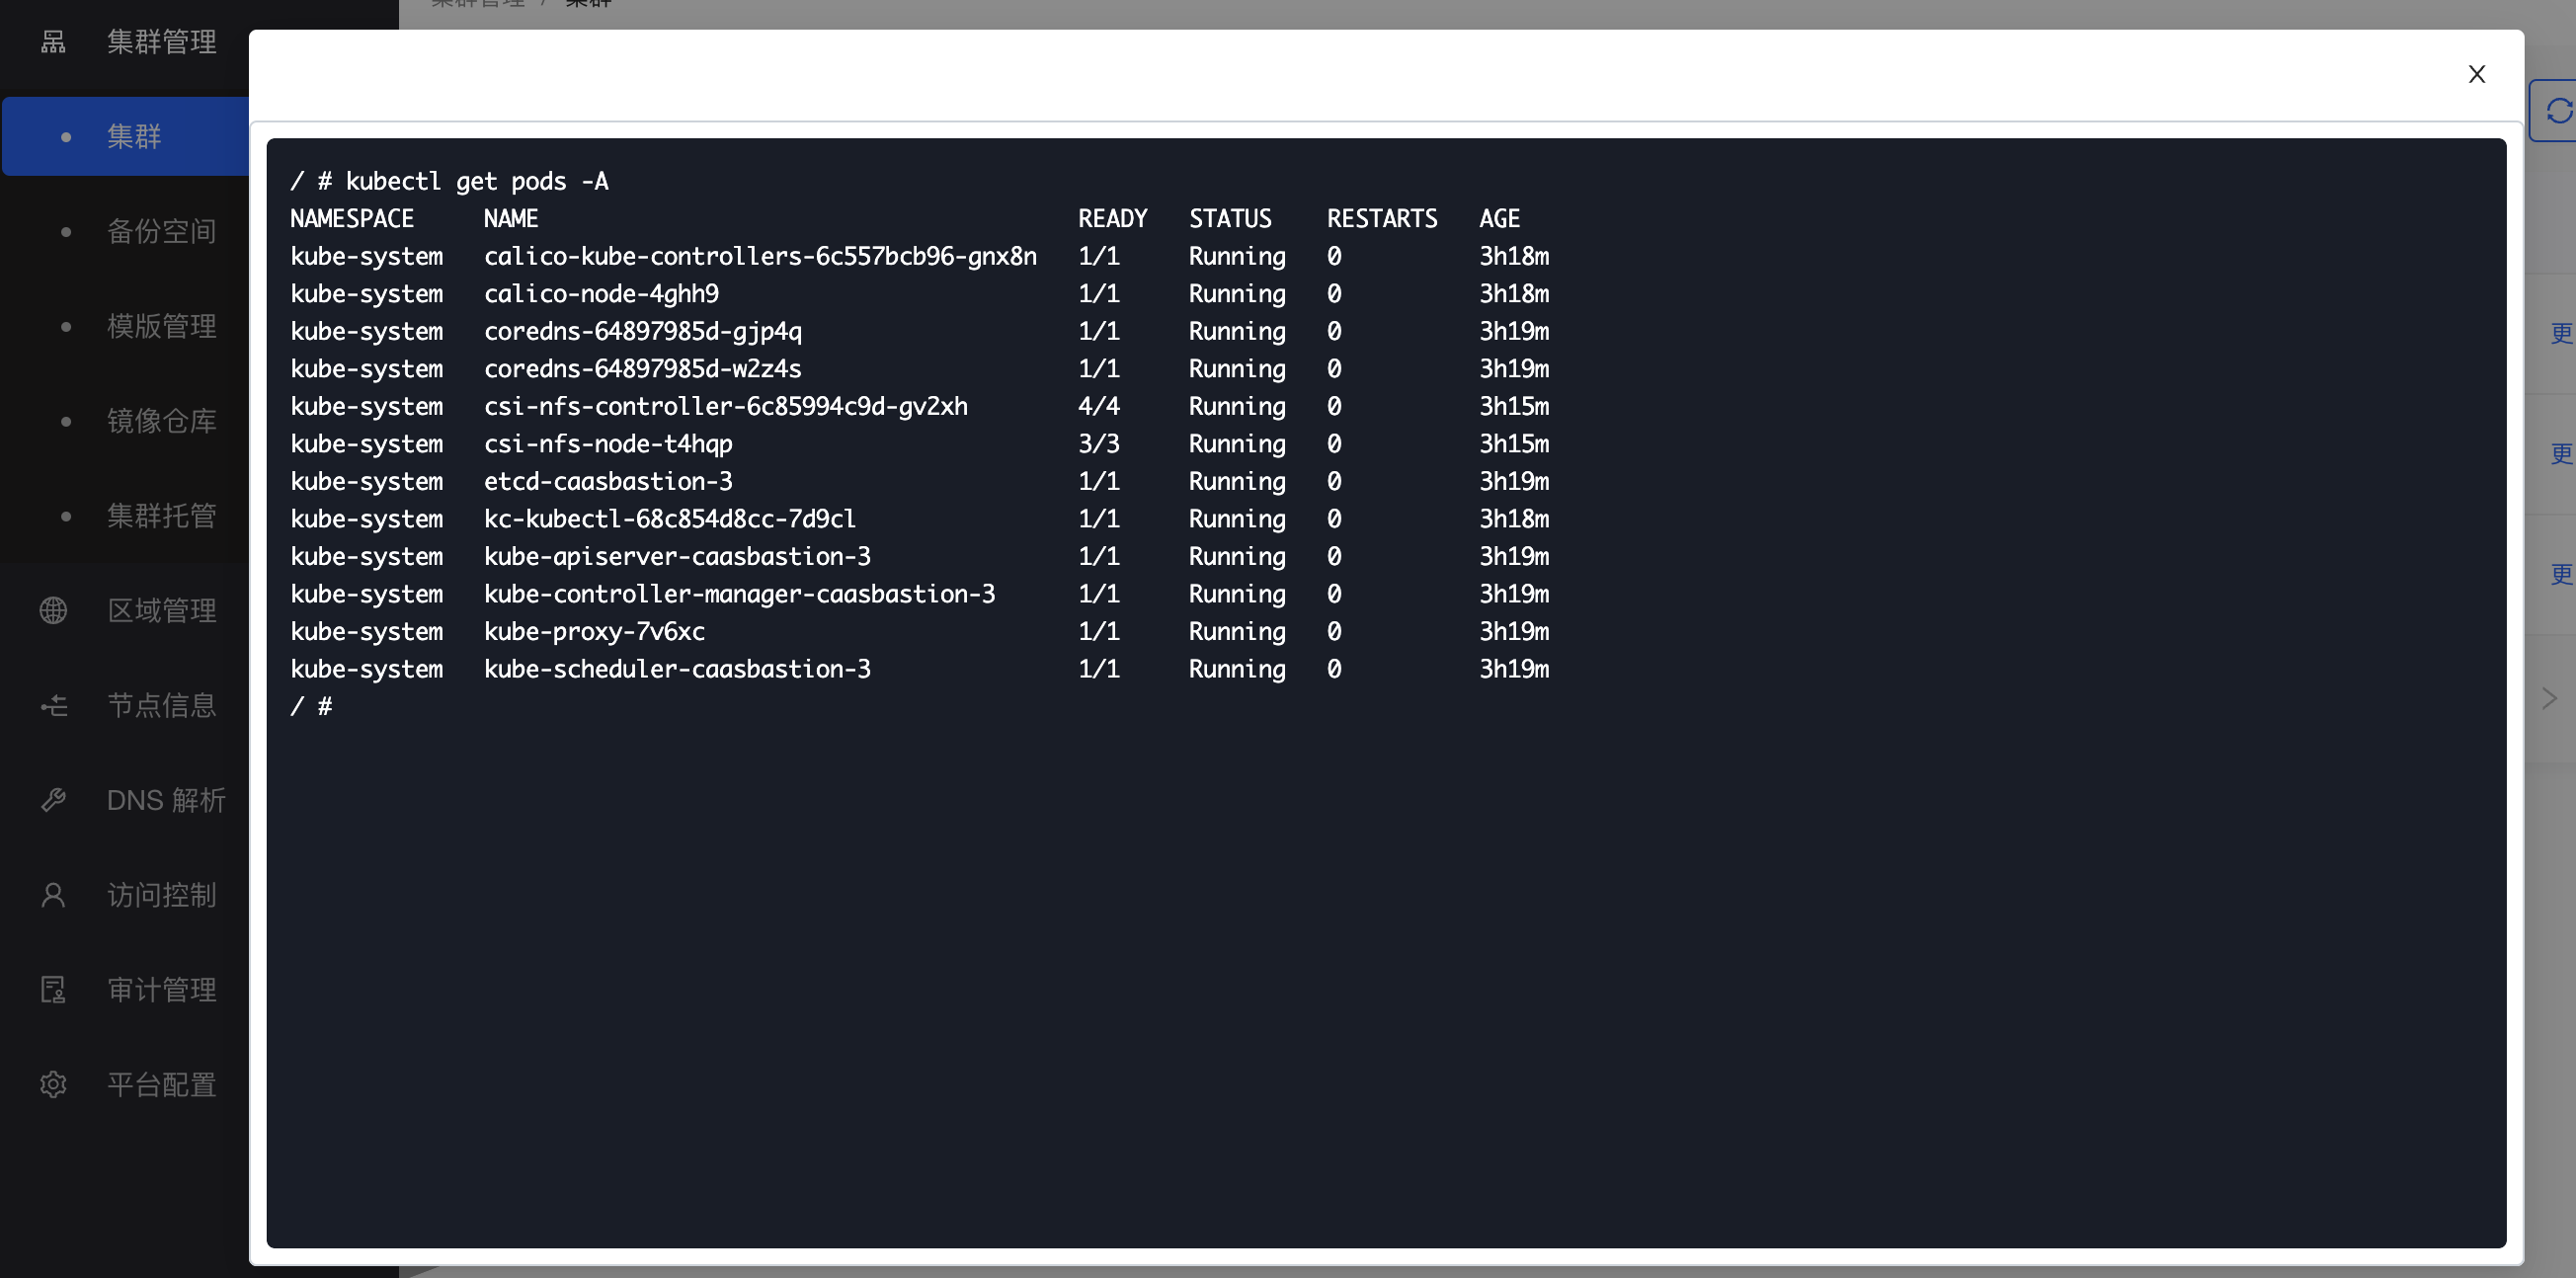
Access Kubectl
The Kubernetes command-line tool, kubectl, allows you to run commands on Kubernetes clusters. You can use kubectl to deploy applications, inspect and manage cluster resources, view logs, and more.
Click "More" > "Connect Terminal" in the cluster operation, and you can execute the kubectl commands in the cluster kuebectl pop-up window.
Cluster Settings
Edit
You can click More > Cluster Settings > Edit on the right of the cluster list to edit the cluster description, backup space, external access IP address, and cluster label information.
Save as template
You can click More > Cluster Settings > Save as Template on the right of the cluster list to save the cluster settings as a template and use it to creat new clusters with similar configurations.
CRI Registry
Docker and Containerd use dockerhub as the default registry. If you need to use other private registry (especially self-signed https registries or http registries), you need to configure CRI registry.
Click “More” > “Cluster Settings” > “CRI Registry” on the right of the cluster page. In the pop-up window configure the required private registry. You can select an existing registry on the platform or temporarily enter the address of a registry. For a self-signed https or http registry, it is recommended to add the registry information on the Cluster Management > Registry in advance.
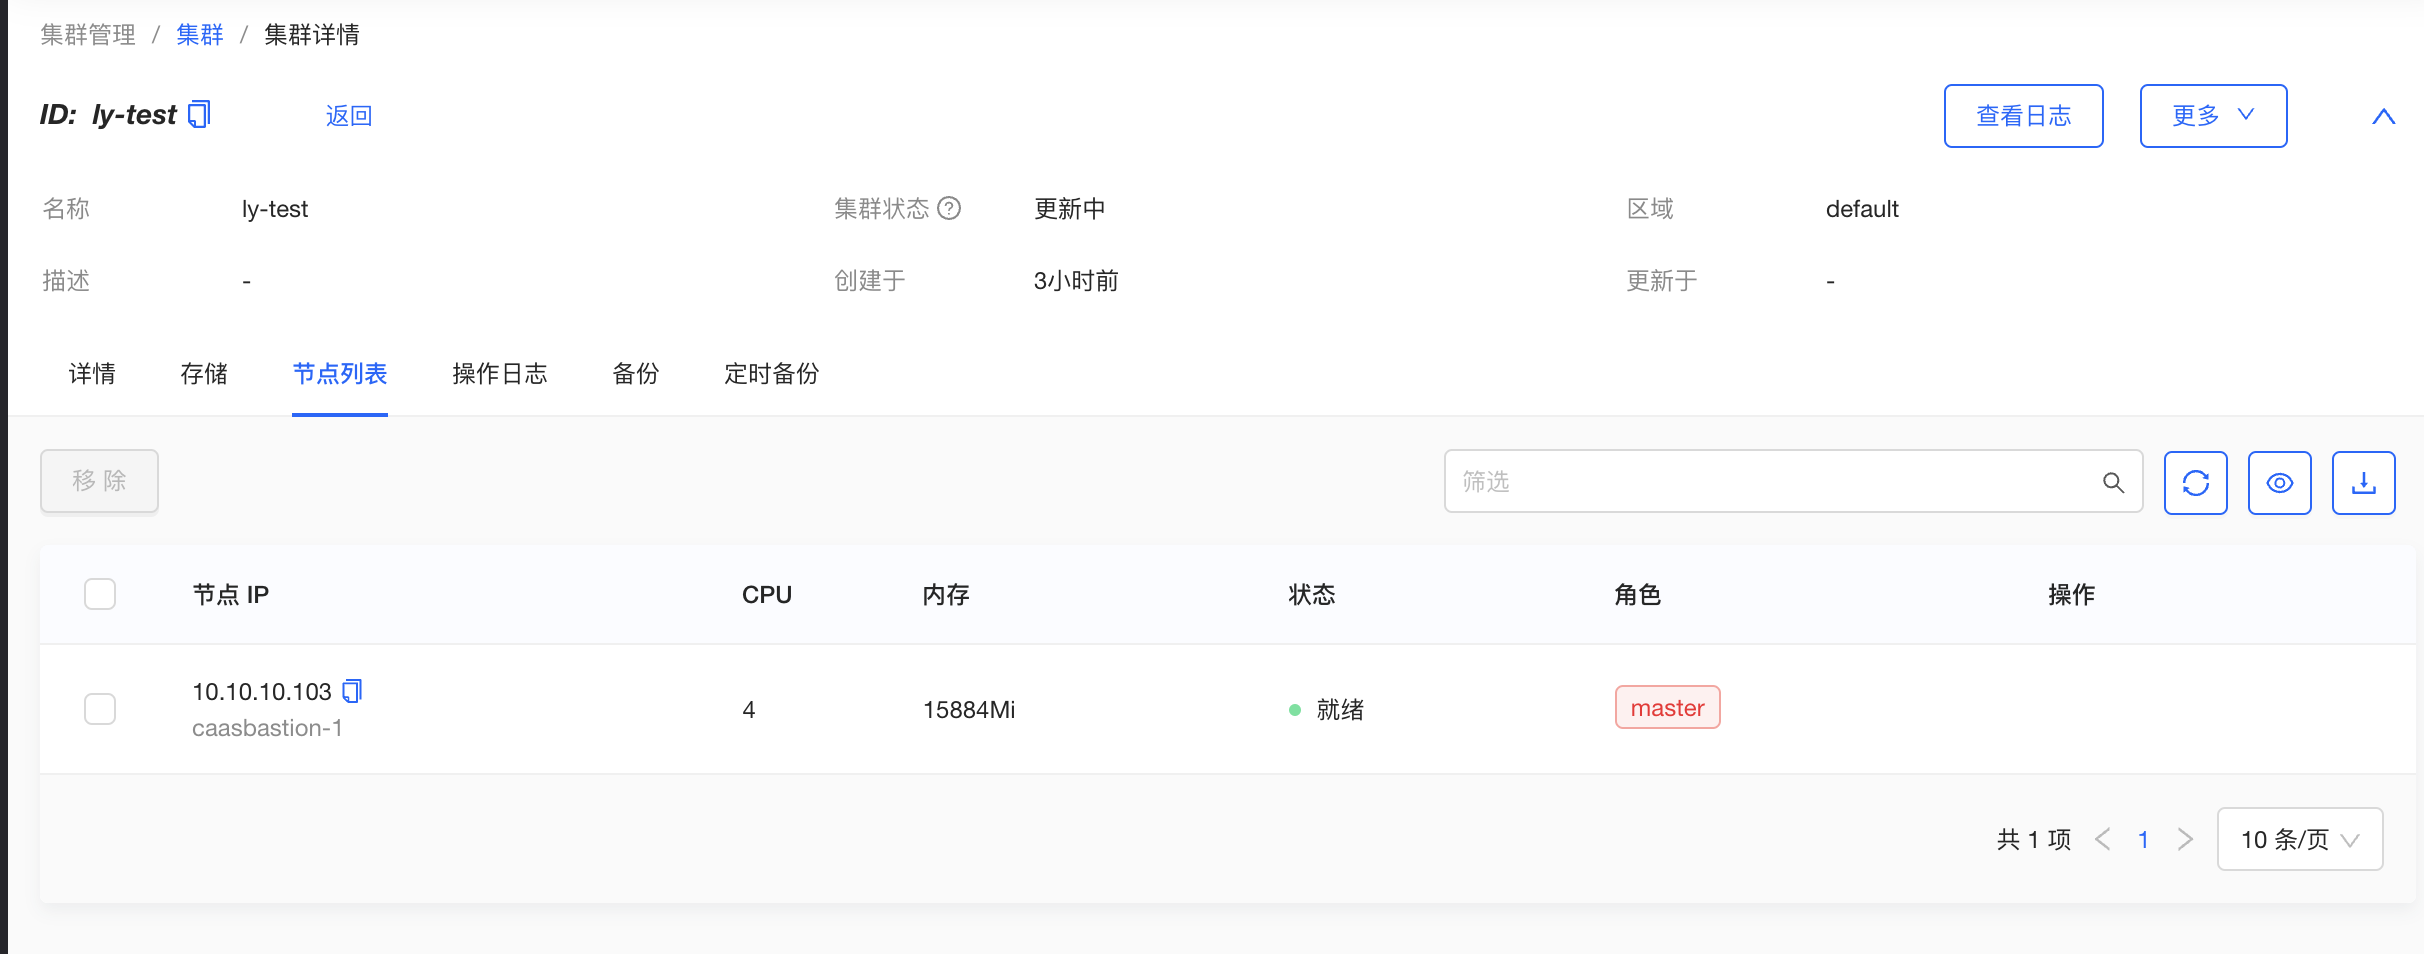
Cluster node management
On the "Nodes list" page of the cluster detail page, you can view the list of nodes in the cluster, specification, status and role information of the nodes.
Add cluster node
When the cluster load is high, you can add nodes to the cluster to expand capacity. Adding nodes operation does not affect the running services.
On the cluster detail page, under the Node List tab, click the "AddNode" button on the left, select the available nodes in the pop-up window, set the node labels, and click the "OK" button. The current version only supports adding worker nodes.
Remove cluster node
On the cluster detail page, under the Node List tab, you can remove a node by clicking the "Remove" button on the right of the node. The current version only supports removing worker nodes.
Note: To remove cluster nodes, you need to pay attention to security issues in production to avoid application interruptions.
Cluster Backup and Recovery
The backup of kubernetes cluster by KubeClipper backs up the data of ETCD database, and kubernetes resource object, such as namespaces, deployments, configMaps. The files and data generated by the resource itself are not backed up. For example, the data and files generated by the mysql pod will not be backed up. Similarly, the files under the PV object are not backed up, only the pv object is backed up. The backup function provided by KubeClipper is hot backup, which does not affect cluster usage. While KubeClipper strongly disapproves of backing up during the "busy period" of the cluster.
Create a backup space
Before performing a backup operation, you need to set a backup space for the cluster, that is, set the storage location of the backup files. The storage type of the backup space can be FS storage or S3 storage . Tack the node local storage , NFS storage and MINIO storage as examples:
Node local storage (only for AIO experimental clusters):
Create a storage directory. Connect to the cluster master node terminal ( refer to Connect Nodes Terminal ) and use the mkdir command to create the "/root/backup" directory in the master node.
Create a backup space. Click "Cluster Management" > "backup space" to enter the backup space list page, click the "Create" button in the upper left corner, in the Create pop-up window, enter "Backup Space Name", such as "local", select "StorageType" as "FS", fill in "backupRootDir" as "/root/backup".
Set up the cluster backup space. When creating a cluster, select "backup space" as "local" on the "Cluster Config" page, or edit an existing cluster and select "local" as the "backup space".
Note: Using a local node to store backup files does not require the introduction of external storage. The disadvantage is that if the local node is damaged, the backup files will also be lost, so it is strongly disapproved in a production environment .
- NFS:
Prepare NFS storage. Prepare an NFS service and create a directory on the NFS server to store backup files, such as "/data/kubeclipper/cluster-backups".
Mount the storage directory. Connect the cluster master node terminal ( refer to Connect node Terminal ), use the mkdir command to create the "/data/kubeclipper/cluster-backups" directory in each master node, and mount it to the /data/kubeclipper/cluster-backups directory of the NFS server.
Command example:
mount -t nfs {NFS\_IP}:/data/kubeclipper/cluster-backups /opt/kubeclipper/cluster-backups -o proto = tcp -o nolockCreate a backup space. Click "Cluster Management" > "Backup Space" to enter the backup space list page, click the "Create" button in the upper left corner, in the Create pop-up window, enter "Backup Space Name", such as "nfs", select "StorageType" as "FS", fill in "backupRootDir" as "/opt/kubeclipper/cluster-backups".
Set up the cluster backup space. When creating a cluster, select "backup space" as "nfs" on the "Cluster Config" page, or edit an existing cluster and select "nfs" as the "backup space".
- MINIO:
Prepare MINIO storage. Build MINIO services, refer to the official website https://docs.min.io/docs/minio-quickstart-guide.html for the deployment process, or use existing MINIO services.
Create a backup space. Click "Cluster Management" > "Backup Space" to enter the backup space list page, click the "Create" button in the upper left corner, in the Create window, enter "Backup Space Name", such as "minio", select "Storage Type" as "S3", fill in "bucket name", such as "kubeclipper-backups", the bucket will be automatically created by kubeclipper, fill in the IP and port number of the MINIO storage service in the first step in "Endpoint", fill in the service username and password, click the "OK" button.
Set up the cluster backup space. When creating a cluster, select "backup space" as "minio" on the "Cluster Config" page, or edit an existing cluster and select "minio" as the "backup space".
You can view the list and details of all backup spaces on the "Cluster Management">"backup spaces" page and perform the following operations:
Edit: Edit the backup space description, and the username/password of the S3 type backup space.
Delete: Delete the backup space. If there are backup files under the backup space, deletion is not allowed.
Cluster backup
You can back up your cluster ETCD data by clicking the "More" > “Backup and recovery” > "Backup Cluster" button in the cluster operation.
You can view all backup files of the cluster under the Backup tab on the cluster detail page, and you can perform the following operations for backups:
Edit: Edit the backup description.
Restore: Performs a cluster restore operation to restore the cluster to the specified backup state.
Delete: Deletes the backup file.
Scheduled backup
You can also create a scheduled backup task for the cluster, click the "More" > “Backup and recovery” > "Scheduled Backup" button in the cluster operation, in the Scheduled Backup pop-up window, enter the scheduled backup name, execution type ( repeat / onlyonce) and execution time, and set the number of valid backups for a repeat scheduled backups, and click the "OK" button.
kubeClipper will perform backup tasks for the cluster at the execution time you set, and the backup file will be automatically named "Cluster Name - Scheduled Backup Name - Random Code". For repeat scheduled backups, when the number of backup files exceeds the number of valid backup files, kubeClipper will automatically delete the earlier backup files.
After the scheduled backup task is added, you can view the scheduled backup task information on the "Scheduled Backup" tab of the cluster detail page, and you can also view the backup files generated by the scheduled backup on the "Backup" tab.
For scheduled backup tasks, you can also perform the following operations:
Edit: Edit the execution time of the scheduled backup task and the number of valid backups for repeat scheduled backups.
Enable/Disable: Disabled scheduled backup tasks are temporarily stopped.
Delete: Delete a scheduled backup task.
Restore Cluster
If you perform restore operation while the cluster is running, KubeClipper will perform overlay recovery on the cluster, that is, the ETCD data in the backup file, overwriting the existing data .
You can click the "Restore" button on the right side of the backup under the Backup tab of the cluster detail page; or click the "More" > “Backup and recovery” > "Restore Cluster" button in the cluster operation, and select the backup to be restored in the Restore Cluster pop-up window. The current cluster can be restored to the specified backup state.
Note: After the kubernetes version of the cluster is upgraded, it will no longer be possible to restore the cluster to the pre-upgrade backup version.
Cluster Status
Cluster version upgrade
If the cluster version does not meet the requirements, you can upgrade the kubernetes version of the cluster. Similar to creating a cluster, you need to prepare the configuration package required and the kubernetes image of the target version, upload them to the specified location. For details, refer to Prepare to Create a Cluster.
Click the "More" > “Cluster status” > "Cluster Upgrade" button of the cluster operation. In the cluster upgrade pop-up window, select the installation method and registry, and select the target upgrade version. The installation method and the configuration of the kubernetes version are the same as those of creating a cluster. For details, please refer to Cluster Configuration Guide.
Cluster upgrades can be performed across minor versions, but upgrades skipped over later versions are not supported. For example, you can upgrade from v1.20.2 to v1.20.13, or from v1.20.x to v1.21.x, but not from v1.20.x to v1.22.x. For version 1.23.x, upgrading to version 1.24.x is not currently supported.
The cluster upgrade operation may take a long time. You can view the operation log on the cluster detail page to track the cluster upgrade status.
Delete cluster
You can click “More” > “Cluster Status” > “Delete Cluster” on the right of the cluster list to delete the cluster.
Note that after the cluster is deleted, it cannot be restored. You must perform this operation with great caution. If the cluster is connected to an external storage device, the volumes in the storage class whose reclaim policy is “Retain” will be retained. You can access them in other ways or manually delete them. Volumes in the storage class whose reclaim policy is “Delete” will be automatically deleted when the cluster is deleted.
Reset the status
After cluster operation (such as creation, restoration, and upgrade) failure, the cluster status may be displayed as “xx failed” and other operations cannot be performed. If the operation can not be retrayed successflly. You need to refer to the O&M document to manually rectify the cluster error, and click More > Cluster Status > Reset Status to reset the cluster to normal status.
Cluster plugin management
In addition to installing plugins when creating a cluster, you can also install plugins for a running cluster. Taking the installation of storage plugins as an example, click the "More" > “plugin management”>"Add Storage" button in the cluster operation to enter the Add Storage page. You can install NFS plugins for the cluster. The installation configuration is the same as the configuration in cluster creation.
For installed plugins, you can view the plugin information on the cluster detail page, and perform the following operations:
- Save as Template: Save the plugin information as a template for use by other clusters
- Remove plug-in: Uninstalls the cluster plug-in.
Cluster certificate management
Update cluster certificate
The default validity period of the kubernetes cluster certificate is one year. You can view the certificate expiration time in the basic information on the cluster detail page. You can also view the certificate expiration notification in the cluster list the day before the certificate expires. To update the cluster certificate, click “More” > “Cluster Certificate” > “Update Cluster Certificate” in the cluster operation to update all cluster certificates.
View kubeconfig file
You can click “More” > “Cluster Certificate” > “View KubeConfig File” button in the cluster operation to view the cluster kubeconfig file, or click “Download” button in the pop-up window to download the kubeconfig file.
4.4 - Node management
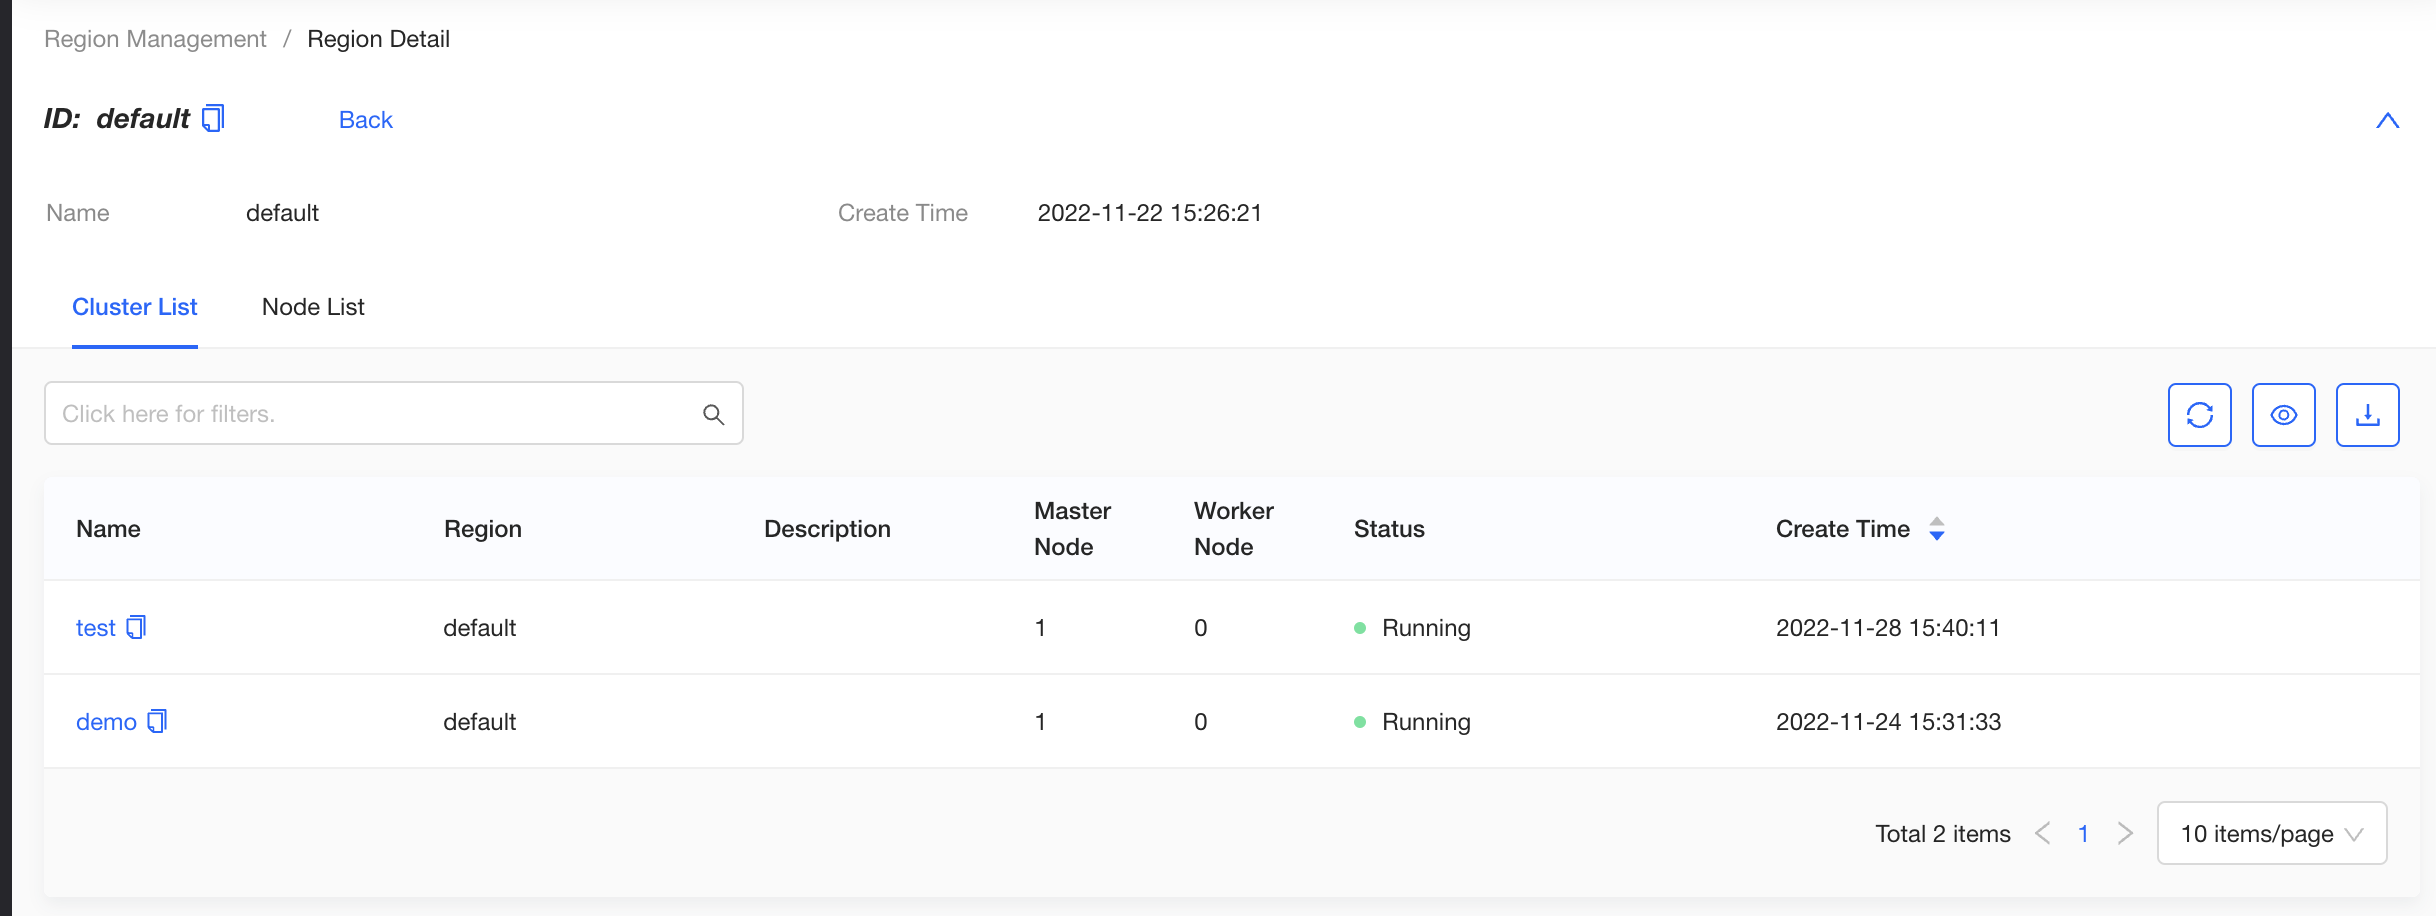
Region management
KubeClipper supports multi-region management. That is, all nodes and clusters managed by the platform are divided into physical or logical regions. On the Region Management page, you can view all regions in the platform. Click a region name to enter the region detail page, and you can view the clusters and nodes in the region.
Node management
The platform supports multi-region management, that is, the owning region of all nodes managed by the platform. On the Region Management page, you can view all regions managed by the platform. Click a region name to go to the region details page, where you can view the list of all clusters and nodes in the region.
On the "Node Info" page, you can view the list of all nodes managed in the platform, node specifications, status and other information. Click the node name to enter the node detail page, you can view detailed node basic information and system information.
The node status in KubeClipper represents the management status of the node by kc-gent. Under normal circumstances, the node status is displayed as "Ready". When the node is out of contact for 4 minutes (within 10s of the error time), the status will be updated to "Unknown". Nodes with unknown status cannot perform any operations, nor can they create clusters or add/remove nodes to clusters.
Add node
When deploying KubeClipper, you can add the initial server nodes which are used to deploy KubeClipper's own services, and agent nodes which are used to deploy kubernetes clusters. In a KubeClipper environment for experimentation or development, you can add a server node as an agent node at the same time. However, if it is used for a production environment, it is recommended not to reuse the server node as an agent node.
You can also use the kcctl join command to add agent nodes to KubeClipper, and mark a region for each agent node. The region can be a physical or logical location. You can use nodes in the same region to create a kubernetes cluster, but cannot use nodes across regions to create a cluster. Nodes in unmarked regions belong to the default region.
Command line example:
kcctl join --agent beijing:1.2.3.4 --agent shanghai:2.3.4.5
Remove node
When you no longer need some nodes, you can use the kcctl drain command to remove nodes from the platform.
Command line example:
kcctl drain --agent 192.168.10.19
Connect Terminal
On the node list page, you can click the "Connect Terminal" button on the right side of the target node, enter the node port and username password information in the pop-up window, access the node SSH console and execute command tasks.
Enable/disable a node
You can click the Disable button on the right side of the node to temporarily disable the node. The node in the disabled state cannot be created or added to the cluster.
4.5 - Access control
Create user
After installing KubeClipper, you need to create a user of a desired role. Initially, there is only one user, admin, by default, with the platform administrator role.
Click "Access Control" > "Users" to enter the user management page, click the "Create User" button in the upper left corner, fill in the user name, password, alias name and other information in the pop-up window, specify the user role, and click the "OK" button. The four initial roles in the system are as follows:
platform-admin: Platform administrator, with the authority to set platform, cluster management, user management, audit, etc.
cluster-manager: Cluster administrator, with all cluster management permissions.
iam-manager: User administrator, with all user management permissions.
Platform-view: Platform read-only user, with all platform viewing permissions.
After the user is created, you can view the user details and login logs on the user detail page and perform the following operations:
Edit: Edit user alias, role, mobile phone number, email information.
Edit Password: Edit the user login password.
Delete: Delete the user.
Create a custom role
In addition to system initial roles, you can also create customized roles to meet business needs.
Click "Access Control" > "Roles" to enter the role management page. You can click the "Create Role" button in the upper left corner to create a custom role.
On the Create Role page, you need to fill in the role name and description, and check the permissions required. Some permissions depend on other permissions. When these permissions are selected, the dependent permissions will be automatically selected.
After creating a customized role, you can view the basic role information, role permission list, authorized user list on the role detail page, and perform the following operations:
Edit: Edit the custom role description.
Edit permissions: Edit permissions of the customized role.
Delete: To delete a customized role, make sure that no user is using the role to be deleted.
Access to external users
External users can log in to KubeClipper via the OIDC protocol .
First, the platform administrator needs to log in to the platform server node and insert the following information under “authentication” in the kubeclipepr-server.yaml file:
oauthOptions:
identityProviders:
- name: keycloak
type: OIDC
mappingMethod: auto
provider:
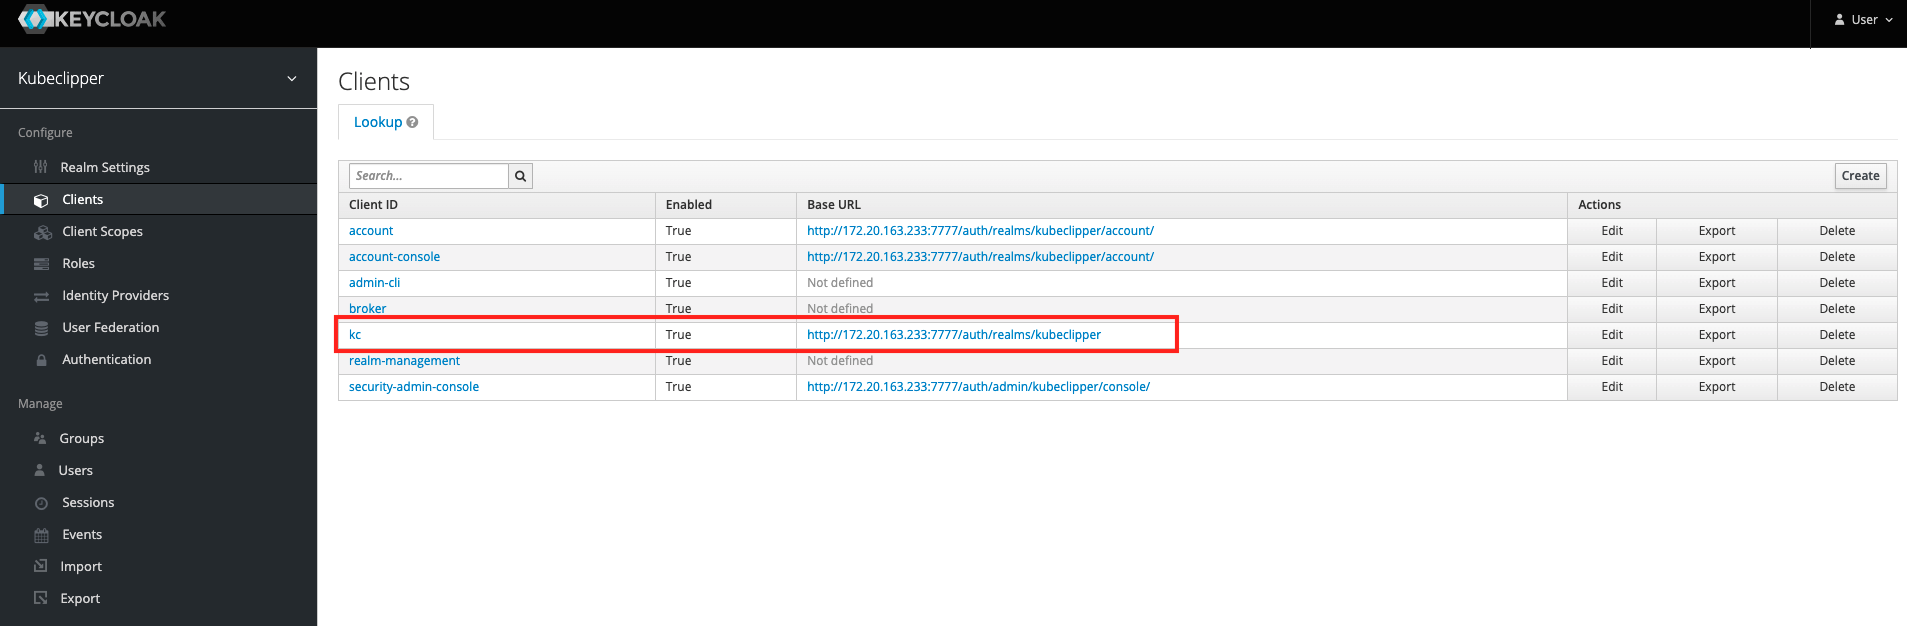
clientID: kc
clientSecret: EErn729BB1bKawdRtnZgrqj9Bx0]mzUs
issuer: http://172.20.163.233:7777/auth/realms/kubeclipper
scopes:
- openid
- email
redirectURL: http://{kc-console-address}/oatuh2/redirect/{IDP-Name}
Under "provider", you need to fill in the clientID , clientSecret , and issuer information of your OAuth2 service, taking keycloack as an example, as shown in the figure below.

RedirectURL example: http://172.0.0.90/oauth2/redirect/keycloack
OAuth2 users can log in to the KubeClipper platform by following these steps:
Click the "OAuth2 Login" button on the login page, enter the OAuth2 login page, fill in the username and password to enter the KubeClipper platform. When logging in for the first time, you will not be able to access the platform because you have not been granted any permission.
The platform administrator or other user with user management rights log in to KubeClipper, find the target OAuth2 user on the user management page, and set the user role by editing the user information.
The OAuth2 user repeats the first step, logs in to KubeClipper, and accesses the platform normally.